Showing posts with label C#. Show all posts

Saturday, 3 February 2024

Use C# To Access Blog (Blogger.com)

Overview

Blogger.com offers a fairly easy way to upload and manipulate content. However, I think it falls short in certain aspects.

  • View existing post titles and links.
    Useful for adding links to other posts when creating a new post.
  • Offline synchronization
    It would be useful to store all posts on a local drive. Each post would be stored within its own directory. This allows additional information to be associated with a post, e.g. coding projects.

In this post I will show how to use the Google API to obtain blog/post information.

In this post

Requirements

The following requirements were obtained by understanding what the API is capable of. The following links give details.

The primary requirements are to access blog post information from Blogger.com using is API (Application Programming Interface).

This can be broken down into subtasks.

  • Get blog summary
    This will include title, description, date published, date last updated, the primary URL, total page and post counts.
  • Get a summary of posts
    Each post summary should contain, as a minimum, the title, url, date published, date last updated.
  • Get post
    Get post should return the HTML content and post summary.
Top

Blogger.com API Basics

The API expects a URL to query blog/post information. The URL must include an API key.

A typical request URL is https://www.googleapis.com/blogger/v3/blogs/{BlogId}?key={Your API key}

BlogId can be found by logging in to Blogger.com and selecting posts (the default when signing in). You should see something like...
https://www.blogger.com/blog/posts/1967019************
The number following /posts/ is the blog id.

To use the Blogger.com API you will need an API key. This is standard practice for online services. An existing blog site is required for this stage. Visit Creating an API key.

The Blogger.com API returns Json assuming a request was successful.

Top

Sunday, 3 September 2023

Simple List Control - Part 1

Overview

In this post I will detail how to create a Windows Forms application that hosts a simple list control. The list control is akin to the ListBox control but developed from scratch. This tutorial will start with basics, creating the necessary control(s), painting and so on. The tutorial will then discuss slightly more advanced topics such as scrolling, paint optimisation, selection and so on.

In this post

Project Creation

We will create a WinForms project to host the simple list control. For this project I am using Visual Studio Community Edition 2022. The project targets .NET Framework 4.8.

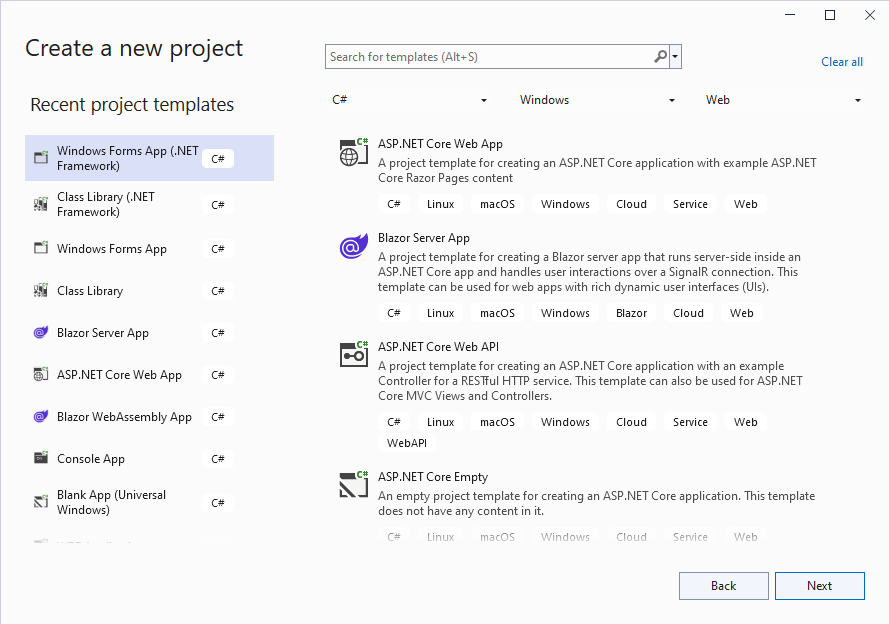
1. Create a new Winforms project (.NET Framework).

Figure 1 - Creating the project

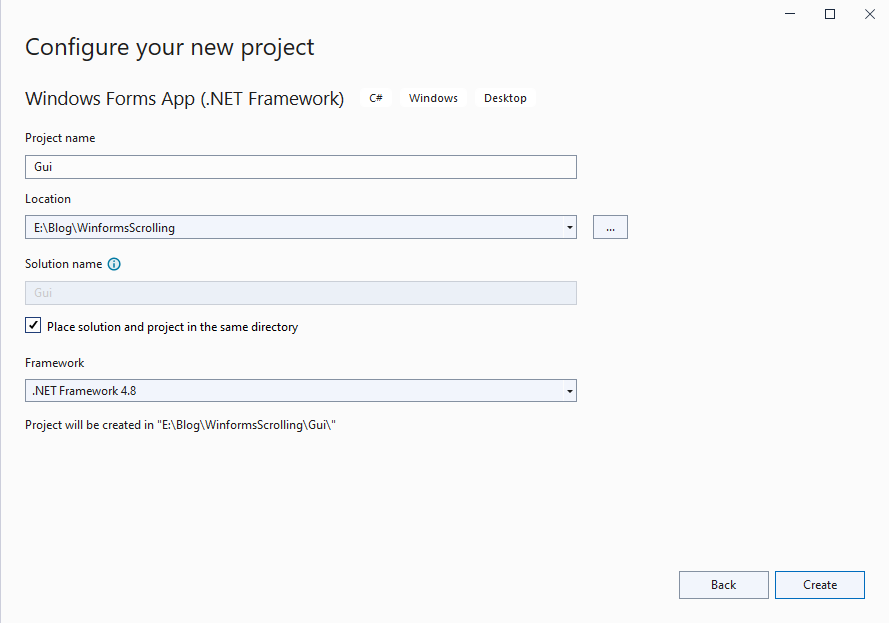
2. Configure the project.

Figure 2 - Configuring the project

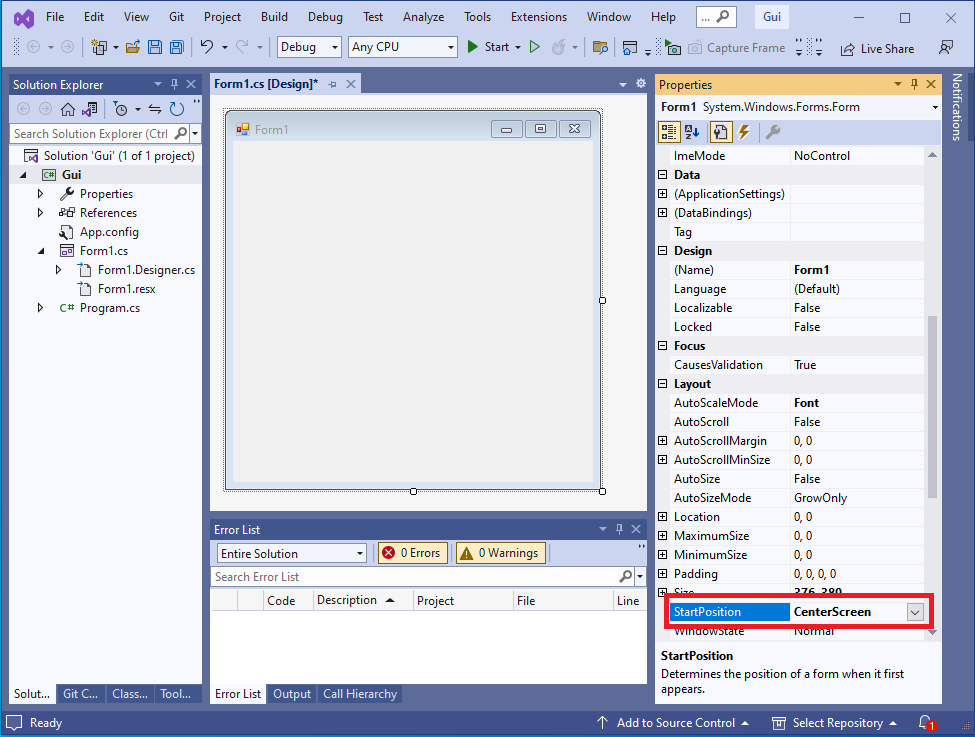
3. Configure the main form properties.

This step is optional, the defaults will suffice. I prefer to ensure that the form will display center screen.

Figure 3 - Configuring the main form
Top

Adding A User Control

A User Control will be used to host the simple list control. The control will implement painting, scrolling, selection and so on.

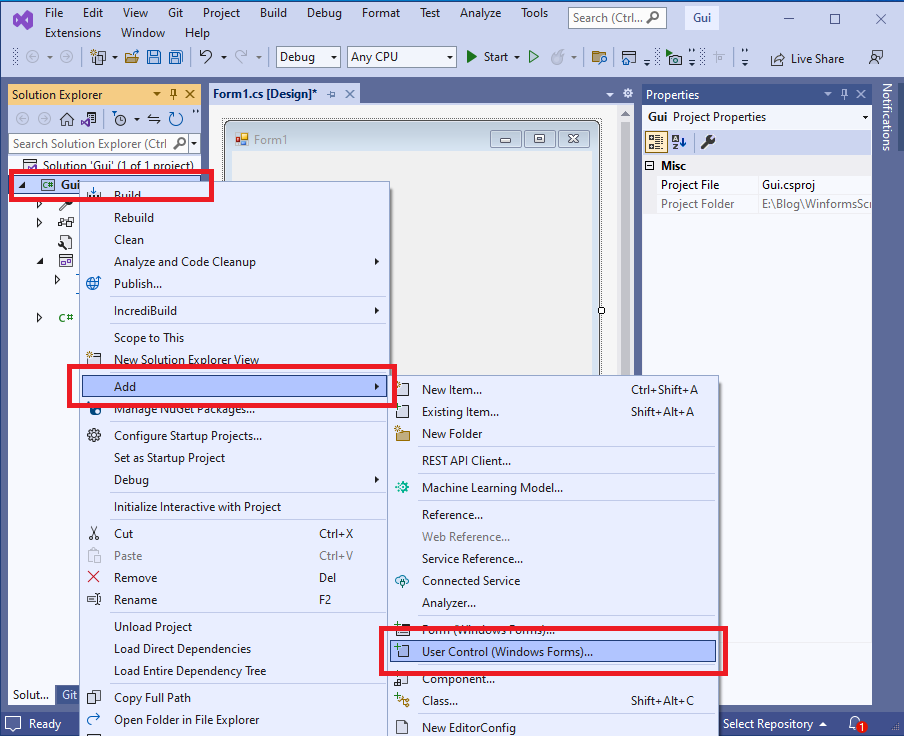
1. Add a new user control

Figure 4 - Add a new user control

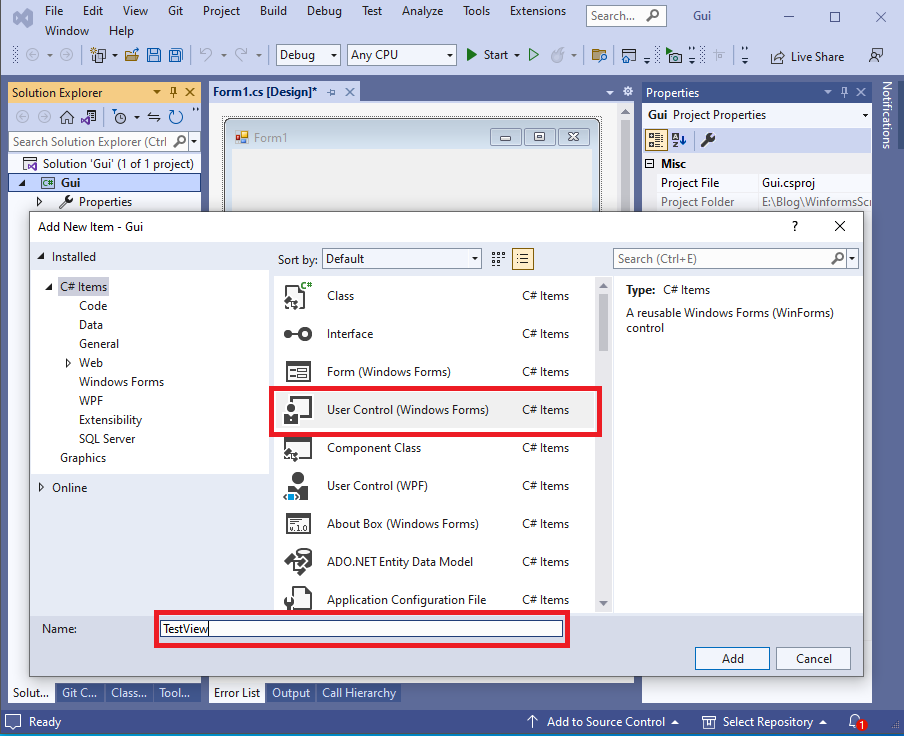
2. Name the user control

I've chosen to name the control TestView. You can name the control anything you wish. However, you will need to make changes to subsequent code to reflect your chosen name.

Figure 5 - Name the new user control

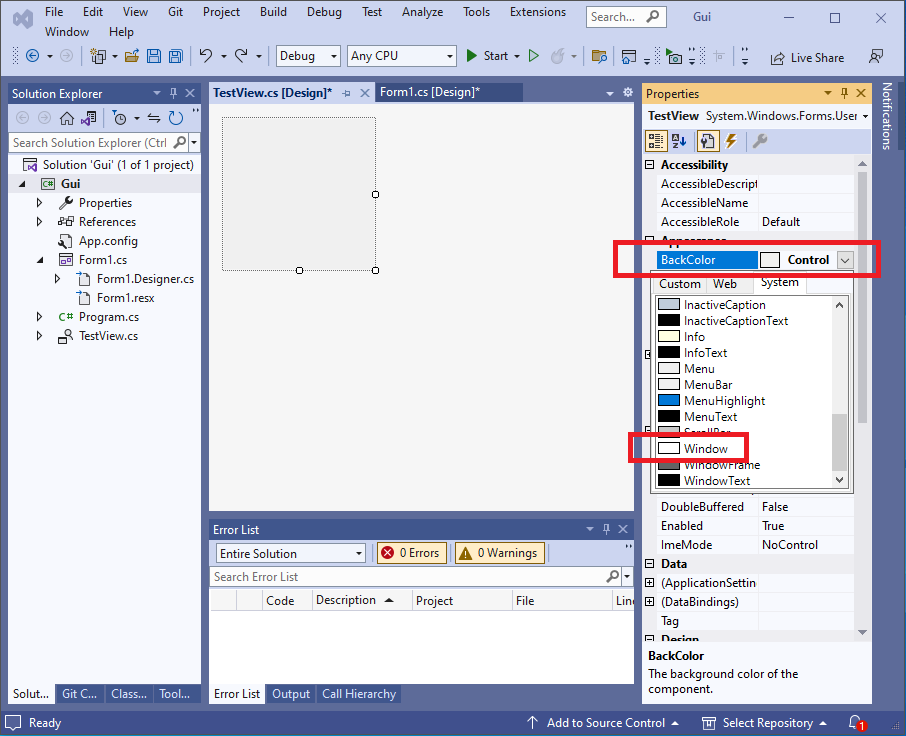
3. Configure the user control

To configure the user control, simply change the background colour to Window (default colour being white).

Figure 6 - Configure the user control
Top

Adding The User Control To The Main Form

1. First build the project to ensure the the user control is ready for use. In Solution Explorer, right-click the Gui project the select build or press the F6 key.

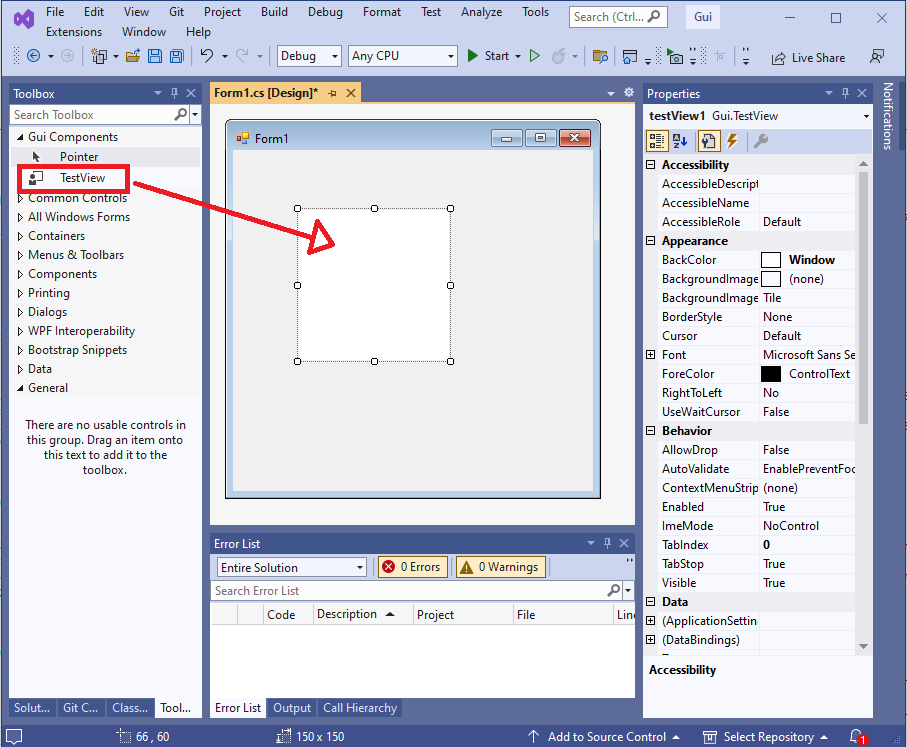
2. Switch to the Toolbox tab and drag the TestView component to the main form.

Figure 7 - Main form hosting the user control

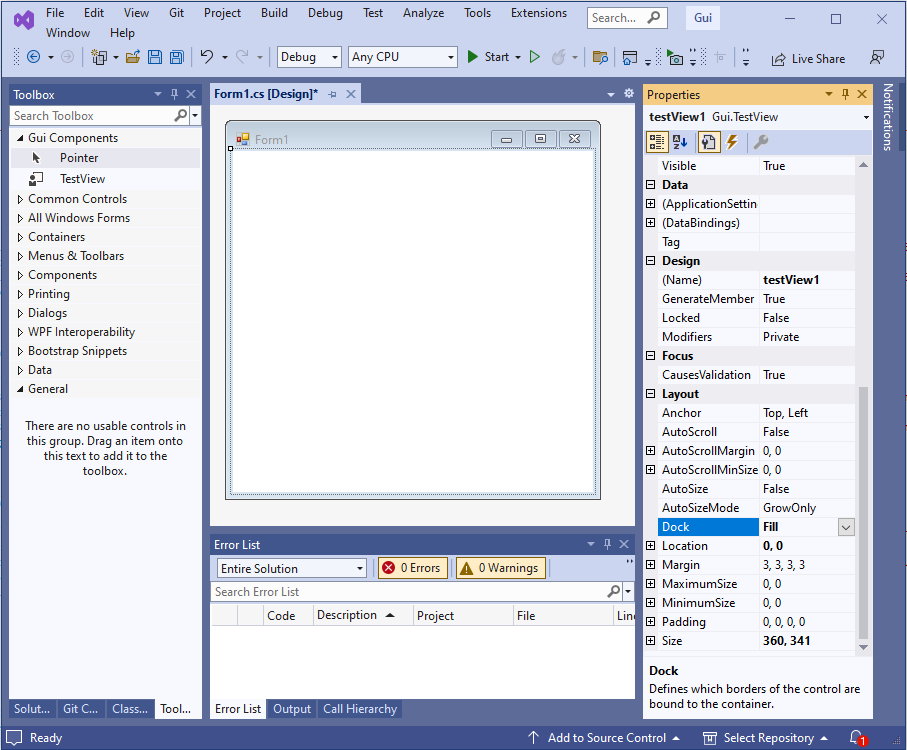
3. Finally, select the user control then select the dock property and change to Fill.

Figure 8 - User control docked to main form
Top

Summary

In this post I described the initial steps for creating a simple list control. To ensure the post does not become to long, I concentrated on creating and configuring the project. I then proceeded to add a user control that will house the list control's functionality. In the next post we will start writing code to implement list view functionality.

Top

Simple List Control - Part 2

Overview

In my previous post I detailed the steps required to create WinForms project that will eventually house a simple list control.

This post discusses how to implement basic row painting. A brief overview of the Windows painting mechanism is included.

In this post...

Top

Basic Winforms Painting Mechanics

Typically, all painting in a WinForms control is performed by responding to the Paint event. In a derived control overriding the OnPaint method achieves the same result. ALL painting should occur within the OnPaint method. Whilst creating a graphics context within a control is possible, it is generally frowned upon.

Windows raises a paint event whenever a control is resized, or a portion is uncovered, say, after moving another window over the control. It is also possible to cause Windows to raise the paint event manually, by calling the control's Invalidate method. Calling Invalidate will force an entire client area repaint. It is also possible to force a smaller area to be repainted by passing a rectangle to the Invalidate method.

A control conists of zero or more non-client areas and a client areas. Non-client areas include items such as borders, scroll bars and so on. Certain controls perform custom non-client painting. One such example is the list view control that draws column header cells within the non-client area. For our simple control we will only be painting within the client area.

Figure 1 - Client and non-client areas

For the simple list control, we will simply paint all available rows whenever a paint request is received. Whilst this is a somewhat naive approach, it serves as a decent starting point.

Top

Generating Row Data

Switch to the solution tab and select the TestView.cs item. Right-click, then select View Code (or press F7) to view the auto-generated code. You should see something like the following (I removed unused usings for brevity).

using System.Windows.Forms;
using System.Drawing;

namespace Gui
{
  public partial class TestView : UserControl
  {
    public TestView()
    {
      InitializeComponent();
    }
  }
}

Before we can paint any rows, we need some data. To keep things simple, we can add a class method to add sample rows. I will call this new method, AppendSampleRows. We can then override the OnLoad method to call this method and add rows. We also need to maintain a reference to the rows within the control. A list of strings will suffice for now. Let's call this class member variable, _rows. The following code illustrates the idea.

using System;
using System.Collections.Generic;
using System.Drawing;
using System.Windows.Forms;

namespace Gui
{
  public partial class TestView : UserControl
  {
    private List<string> _rows = new List<string>();
    
    public TestView()
    {
      InitializeComponent();
    }

    public static void AppendSampleRows(int count)
    {
      for (int i=0; i<count; i++)
        AppendRow($"Row {i}");
    }

    protected override void OnLoad(EventArgs e)
    {
      _rowData = GenerateRowData(30);
    }    
  }
}

Code walkthrough...

1. Introduce a class member variable, _rows, this will maintain a list of rows to be painted.

2. Introduce a class method, AppendSampleRows, to add sample row data.

3. Override the OnLoad method and call the AppendSampleRows method.

Top

Painting Rows

Now, we can finally override OnPaint to paint the rows. Modify the code so that it looks like the following...

using System;
using System.Collections.Generic;
using System.Drawing;
using System.Runtime.CompilerServices;
using System.Windows.Forms;

namespace Gui
{
  public partial class TestView : UserControl
  {
    private IEnumerable<string> _rowData = new string[0];
    
    public TestView()
    {
      InitializeComponent();
    }

    public static void AppendSampleRows(int count)
    {
      for (int i=0; i<count; i++)
        AppendRow($"Row {i}");
    }

    protected override void OnLoad(EventArgs e)
    {
      _rowData = GenerateRowData(30);
    }

    protected override void OnPaint(PaintEventArgs e)
    {
      Graphics g = e.Graphics;
      Rectangle rcRow = ClientRectangle;
      int rowHeight = Font.Height;
      rcRow.Height = rowHeight;

      foreach (string rowText in _rowData)
      {
        g.DrawString(rowText, Font, Brushes.Black, rcRow);
        rcRow.Y += rowHeight;
      }
    }
  }
}

Build the project and run it (F5 for debug run, or CTRL + F5). You should see the following...

Figure 2 - First Run

Try resizing the window. You will notice there are no scroll bars. To view all rows, you essentially have to maximise the window. Still, it is about small incremental steps, learning as you go along. You can also modify the count in the GenerateRowData method. Don't expect any surprises, still, it can be useful to experiment.

Top

Code Walkthrough

So, at this point we have a simple control that can display rows of data. Let's do a code walk through.

1. We added a _rows variable that maintains a list of rows to be painted.

2. We added an AppendSampleRows method, which expects a count parameter. This method simply generates strings that our control can display. We generate text that results in row{N}, where N is the row number, this will prove useful for debugging purposes.

3. The OnPaint method was overridden to draw the individual rows. The implementation can be broken down as follows...

  • Create a temp variable 'g', to hold a reference to the graphics context, saves subsequent typing.
  • Drawing occurs within the client area, rcRow will track each row bounding rectangle as we proceed to draw rows.
  • We use the control's font height to specify the row height. Simplistic, but will suffice for a starting point.
  • As each row is of a fixed height, we set the initial height and can simplay walk through each row, adding the row height after each row.
Top

Friday, 10 February 2023

Tree Terminology

In my last post Tree Data Structures I discussed modelling a tree as a raw data structure. That is, a self-describing tree node. In this post I offer some terminology and search/traversal techniques.


Top

In this post...

Top

What Is A Tree?

The following diagram illustrates a basic tree structure.

A tree is data structure that consists of nodes. A tree typically contains a root node (though may contain multiple root nodes). Each tree node contains data that may be searched/traversed.

Top

Examples Of Tree Usage

Trees are an important data structure, examples of use now follow...

Abstract Syntax Tree (AST)

Parsing is essentally data transformation. Take a sequence of characters and produce tokens. One or more tokens are then transformed to create abstract syntax tree nodes (Expressions, Assignment and so on). These nodes can be run against a runtime engine to run script type code. Most modern computer languages follow this idea. AST's can further be transformed to generate intermediate language code (aka byte code).

Top

A Document Object Model

HTML uses a tree structure to describe page elements. The DOM may be manipulated, once the HTML document is fully loaded. The DOM allows new HTML insertion, modifying existing elements and so on. This gives rise to the so-called "dynamic content".

Top

Hierarchical Data

This is possibly where trees excel. Most data is hierarchical in nature. Consider the following simple examples.

  • A company
    Has a CEO. The CEO might manage numerous managers. Managers, manage workers.
  • A Family
    Has a head of the family. Has grandparents. Has offspring which in turn will have their own offspring.
Top

Tree Terminology

Assuming the following tree...

  • A is the root node.
  • Node B1, B2, B3 are child nodes of the root node, A
    Examples
    childrenOf(A) => B1, B2, B3
    childrenOf(B3) => c1, c2
  • Node A, the root node, is also the parent node of nodes B1, B2, B3
    Examples
    parent(B1) => A
    parent(B2) => A
  • Nodes without child nodes are known as leaf nodes.
    Nodes B1, B2, C1 and D1 in the diagram are leaf nodes as they have no child nodes.
  • Nodes have a depth or level.
    The root node(s) are always level 1.
    Node D1, has the highest depth level of 4.
    Examples
    depth(A) => 1
    depth(B1) => 2
    depth(D1) => 4
  • All nodes bar the root node A are descendants of the root node.
    Examples
    descendants(A) => B1, B2, B3, C1, C2, D1 descendants(B3) => C1, C2, D1
  • Sibling nodes are nodes that exist on the same level of the node in question.
    Examples
    siblings(A) => none
    siblings(B1) => B2, B3
    siblings(C1) => C2
Top

Saturday, 4 February 2023

Commands

A command encapsulates a unit of work. Typically, a command might insert/update a database record, send an email or just update a model. There are numerous ways one can model a command. In this post I describe a simple command mechanism that is suitable for standalone applications. I will also discuss the pros and cons of the approach.


Top

In this post...

Top

Creating The Project

The project is a Console Application, using the .NET Framework (Ver 4.8). The project is named, CommandApp.

No external libraries are required for this project.

Top

Extension/Helper methods

To help visualise program flow I add an extension class.

using System;
namespace CommandApp
{
  public static class Extensions
  {
    //The Trace extension allows one to simply output a value to the console.
    //The method is easily modified to send output elsewhere..
    public static void Trace<T>(this T src) =>
      Console.WriteLine(src);
  }
}
Top

Simple Commands

The simple command encapsulates command values. The command is also responsible for its own behaviour, in this case, executing command code. The command is executed synchronously, that is, on the thread that created the command. The following diagram illustrates the concept.

The client is simply code that creates and executes the command. The code for the simple command is as follows...

Top
using System;

namespace CommandApp.SimpleCommands
{
  public abstract class Command
  {
    protected Command() { }

    public bool IsSuccess => null == Exception;

    public Exception Exception { get; private set; }

    public void Execute()
    {
      try
      {
        OnExecute();
      }
      catch (Exception e)
      {
        this.Exception = e;
      }
    }

    public abstract void OnExecute();
  }
}
Top

Code Walkthrough

  • The class is declared as abstract, concrete classes override/implement onExecute to implement the command.
  • Client(s) create a new command instance then call the Execute method which catches any exceptions and places into to the Exception property.
  • Client(s) can query the command to check for success or failure an act appropriately.

Simple command Pros and Cons

Pros

  • Simple to use.
  • No infrastructure required.
  • Command code, that is values and behaviour all in a single class.
  • Works when using the Command base class that refers to a concraete instance. Can thank Polymorphism for this. For example, Command myCmd = new MyCommand()
Top

Cons

  • Command is blocking - main thread blocks whilst waiting for command execution.
  • Including cross-cutting concerns is difficult unless such concerns are included in the Execute parameters. However, this will complicate calling the Execute method.
  • Client(s) can create and execute a given command. Not necessarily bad, but it might be best to separate command creation from command execution. This would allow the software to "inject" code before and after executing code.
Top

Sample Simple Command

The following code illustrates using the simple class. The example Sleeps for 1000ms to simulate a time consuming command.

using System.Threading;

namespace CommandApp.SimpleCommands
{
  public class AddCustomerCommand : Command
  {
    private readonly string _firstName;
    private readonly string _lastName;

    public int Id { get; private set; }

    public AddCustomerCommand(string firstName, string lastName)
    {
      _firstName = firstName;
      _lastName = lastName;
    }

    public override void OnExecute()
    {
      "---------------------------------------------------".Trace();
      $"AddCustomerCommand({_firstName}, {_lastName})".Trace();
      "About to sleep for 1000ms to simulate a time consuming command".Trace();
      Thread.Sleep(1000);
      "Setting Id to 1 to simulate adding a new database record and returning a new Id".Trace();
      Id = 1;
      "completed".Trace();
    }
  }
}
Top

Testing The simple Command

The following code was used to test the simple command...

namespace CommandApp.SimpleCommands
{
  public static class Test
  {
    public static void Run()
    {
      AddCustomerCommand cmd = new AddCustomerCommand("Fred", "Bloggs");
      cmd.Execute();
    }
  }
}

If all goes well, you should see the following text on the command prompt...

Top

Saturday, 28 January 2023

CQRS - C# Style

CQRS - Command and Query Responsibility Segregation.

Quite a mouthful, but essentially is the art of seperating commands and queries with an application. A command chages state, a query retruns data and does not change state.

Most CQRS libraries that I have encountered are verbose and have a large footprint in terms of memory and disk space

I have developed a simple but usuable CQRS library. Currently the library caters for commands, queries are usually much simpler to implement.


Top

In this post...

Top

Commands

A command performs some kind of action and is expected to modify application state. Examples include writing to a database, the console, painting a control. A command typically raises an event to inform the application of state changes. A command will usually contain parameters, used to modify application state. A seperate class is typically responsible for running commands. This allows pre and post actions when acting upon commands.

Top

Events

Commands, as stated perform state changes. An application is informed of state changes using events. In my opinion it is best to keep event classes seperate from commands. This promotes loose-coupling. Consider C# control events, the control hosts the event handler. This means anything wishing to respond to an event must access the control to add the event. This results in tight coupling.

Top

CQRS library

Currently, my CQRS library, whilst simple only caters forcommand end events.

It is available as a separate project to include where requied.

The code follows, then an analysis follows...

using System;
using System.Collections.Generic;
using System.Threading.Tasks;

public static class CQRS
{
  public static readonly CommandBuilder Commands = new CommandBuilder();

  public interface IMessage { }

  public class Event : IMessage { }

  public class Command : IMessage { }

  public interface IHandleCommand<T>
    where T : Command
  {
    Task Handle(T command);
  }

  public class CommandBuilder
  {
    public CommandBuilder Handle<T>(IHandleCommand<T> handler)
      where T : Command
    {
      CommandProcessor<T>.Handler(handler);
      return this;
    }
  }

  public static void Send<T>(T command)
    where T : Command =>
    CommandProcessor<T>.Process(command);

  public static void Raise<T>(T @event)
    where T : Event =>
    EventBus<T>.Raise(@event);

  public static void EventSubscribe<T>(Action<T> handler)
    where T : Event =>
    EventBus<T>.Subscribe(handler);

  public static void EventUnsubscribe<T>(Action<T> handler)
    where T : Event =>
    EventBus<T>.Unsubscribe(handler);

  static class CommandProcessor<T>
    where T : Command
  {
    private static IHandleCommand<T> _handler;

    public static void Handler(IHandleCommand<T> handler) =>
      _handler = handler;

    public static void Process(T command)
    {
      _handler.Handle(command);
    }
  }

  static class EventBus<T>
    where T : Event
  {
    private static readonly List<Action<l;T>> _handlers = new List<Action<T>&t;();

    public static void Raise(T @event)
    {
      foreach (var handler in _handlers)
        handler(@event);
    }

    public static void Subscribe(Action<T> handler)
    {
      _handlers.Remove(handler);
      _handlers.Add(handler);
    }

    public static void Unsubscribe(Action<T> handler)
    {
      _handlers.Remove(handler);
    }
  }
}
Top

CQRS Library Analysis

The library is a .NET framework library targeted for .NET Framework 4.8. That said, the library is very simple so earlier versions might work.

Commands and events are simply messages, but, with different semantics. So, I create a message interface, IMessage, from which both commands and events will implement. Commands must derive from the Command class. Events must derive from the Event class.

Creating a command is deemed a separate concern to executing a command. That is, a command is created with state that conveys potential application state changes. However, a command is not responsible for running itself, mainly due to a lack of global context.

Running commands within a single entry point aids debugging and allows logging, tracing to be added with relative ease.

For each new Command class created a corresponding command handler needs to be present. The interface, IHandleCommand<T> helps to achieve this.

The idea is that many commands might be available, but, an application may only wish to use a subset of said commands.

Top

CQRS Library Functions

  • Send<T>(T command)
    Executes a command using the private CommandProcessor class. The command parameter must be a type derivedfrom the Command class.
  • Raise<T>(T @event)
    Raises an event, the event must be derived from the Event class.
  • EventSubscribe<T>(Action<T> handler)
    Used to register an event handler. The type parameter, T, must be derived from the Event class.
Top

Sunday, 15 January 2023

Working-With-Byte-Arrays

In this post I will show how to read/write different data type values to and from a byte buffer. This should prove useful when working with block data or pages. In this scenario, pages describes database pages or similar block data mechanisms.


Top

In this post...

Top

How To Handle Typed Values

The aim is to read/write different typed values from a byte array. In C++ one can achieve this by using a union. In C# we achieve this by using a struct/class using explicit layout. Explicit layout is the key here as it ensures types are aligned correctly.

The basic idea is to have a number of byte values offset from zero to maximum bytes required. Then add basic types, such as int 16, int 32, int 64, float, etc all at offset zero. Then one can set a float value and read of the four byte values. The same can be done for most basic types, set the value and the read the corresponding byte values. To read typed values, simply populate the byte values accordingly then read the basic type info (int 16, int 32, int float, etc).

For those with a COM background this approach is similar to the VARIANT type.

Top

The Union Value Type


using System;
using System.Runtime.InteropServices;
namespace Blog
{
  [StructLayout(LayoutKind.Explicit)]
  public struct Value
  {
    [FieldOffset(0)] public byte B0;
    [FieldOffset(1)] public byte B1;
    [FieldOffset(2)] public byte B2;
    [FieldOffset(3)] public byte B3;
    [FieldOffset(4)] public byte B4;
    [FieldOffset(5)] public byte B5;
    [FieldOffset(6)] public byte B6;
    [FieldOffset(7)] public byte B7;

    [FieldOffset(0)] public float Float;
    [FieldOffset(0)] public double Double;
    [FieldOffset(0)] public Int16 Int16;
    [FieldOffset(0)] public Int32 Int32;
    [FieldOffset(0)] public Int64 Int64;
  }
}

The above struct declaration shows eight bytes, B0-B7 for data transfer. If using the decimal type this will need to be expanded to include 16 bytes! As can be seen, B0-B7 is byte aligned and offset accordingly.

Note also, that basic types float, double, Int16, etc all start at offset zero. So, if one sets the Float field, the corresponding 4 bytes can be read from B0-B3. To reverse the action, set fields B0-B3, then read the float value.

It is imperative that one knows how many bytes are required for a typed value. The above structure should cover most data types bar decimal. DateTime values can also be stored by first converting to long and using the Int64 field or bytes B0-B7 to recreate.

Top

Testing The Union Value Type

The above can be tested using the following code...

static void RawTest()
{
  Value value = new Value();
  byte[] data = new byte[128];

  int cursor = 0;
  
  // *********************************************************************************************
  // Writing values to the data byte array.
  // *********************************************************************************************
  Int16 v1 = Int16.MaxValue - 1067;
  Int32 v2 = Int32.MaxValue - 10067;
  float v3 = float.MaxValue - 1.07896f;

  // Write an Int16 value to the data byte array.
  // First set the Value's Int16 field, then read two Value bytes.
  value.Int16 = v1;
  data[cursor++] = value.B0;
  data[cursor++] = value.B1;

  // Write an Int32 value to the data byte array.
  // First set the Value's Int32 field, then read four Value bytes.
  value.Int32 = v2;
  data[cursor++] = value.B0;
  data[cursor++] = value.B1;
  data[cursor++] = value.B2;
  data[cursor++] = value.B3;

  // Write a float value to the data byte array.
  // First set the Value's Float field, then read four Value bytes.
  value.Float = v3;
  data[cursor++] = value.B0;
  data[cursor++] = value.B1;
  data[cursor++] = value.B2;
  data[cursor++] = value.B3;

  
  // *********************************************************************************************
  // Reading values from the data byte array.
  // *********************************************************************************************
  cursor = 0;
  
  // Read an Int16 from the data byte array.
  // Set Value's first two byte fields, then read the Value's Int16 field.
  value.B0 = data[cursor++];
  value.B1 = data[cursor++];
  var v1Result = value.Int16;

  // Read an Int32 from the data byte array.
  // Set Value's first four byte fields, then read the Value's Int32 field.
  value.B0 = data[cursor++];
  value.B1 = data[cursor++];
  value.B2 = data[cursor++];
  value.B3 = data[cursor++];
  var v2Result = value.Int32;

  // Read a float from the data byte array.
  // Set Value's first four byte fields, then read the Value's Float field.
  value.B0 = data[cursor++];
  value.B1 = data[cursor++];
  value.B2 = data[cursor++];
  value.B3 = data[cursor++];
  var v3Result = value.Float;

  Console.WriteLine(v1);
  Console.WriteLine(v1Result);
  Console.WriteLine(v2);
  Console.WriteLine(v2Result);
  Console.WriteLine(v3);
  Console.WriteLine(v3Result);
}
Top

Writing Values To A Byte Array

Figure 2 illustrates a byte array filled with values from the previous test code. As the diagram illustrates, data values are byte aligned accordingly. That is, a 16 bit-integer requires 2 bytes, a float or 32-bit integer requires 4 bytes. This approach works well for data blocks comprising of byte arrays. Simply create a byte array, write values and save to disk. Conversely, load a byte array block from disk into memory, then proceed to read actual values.

Top

Improving The Value Interface

The current method of reading/writing values is somewhat verbose. One needs to track the byte array offset (cursor) and the offset to add following a read or write. In addition, explicitly reading and writing to the Value's byte fields (B0...BN) is tiresome and error-prone. The following should help alleviate these problems...

  • Specify the byte array and initial offset.
  • Specify a cursor that is relative to the specified initial offset.
  • Update the cursor accordingly following a read or write operation.
  • Allow the cursor's position to be set manually, the cursor will always be relative to the specified offset.

The following class, ByteBuffer, implements the above features.

using System;

namespace Blog
{
  /// <summary>
  /// Allows values to read/written to/from a byte array.
  /// Specify a byte buffer and initial offset in the constructor.
  /// Data will be read/written at this offset.
  /// The class uses a cursor to indicate current read/write position.
  /// The cursor is always offset by the offset specified in the constructor.
  /// </summary>
  public class ByteBuffer
  {
    private Value _value = new Value();
    private int _internalCursor;
    private int _offset;
    private readonly byte[] _buffer;

    public int Cursor => _internalCursor - _offset;

    public ByteBuffer(byte[] buffer, int offset)
    {
      _buffer = buffer;
      _offset = offset;
      _internalCursor = offset;
    }

    public ByteBuffer SetCursor(int position)
    {
      _internalCursor = _offset + position;
      return this;
    }

    public ByteBuffer Int16(Int16 value)
    {
      _value.Int16 = value;
      _buffer[_internalCursor++] = _value.B0;
      _buffer[_internalCursor++] = _value.B1;
      return this;
    }

    public ByteBuffer Int16(out Int16 result)
    {
      _value.B0 = _buffer[_internalCursor++];
      _value.B1 = _buffer[_internalCursor++];
      result = _value.Int16;
      return this;
    }

    public ByteBuffer Int32(Int32 value)
    {
      _value.Int32 = value;
      _buffer[_internalCursor++] = _value.B0;
      _buffer[_internalCursor++] = _value.B1;
      _buffer[_internalCursor++] = _value.B2;
      _buffer[_internalCursor++] = _value.B3;
      return this;
    }

    public ByteBuffer Int32(out Int32 result)
    {
      _value.B0 = _buffer[_internalCursor++];
      _value.B1 = _buffer[_internalCursor++];
      _value.B2 = _buffer[_internalCursor++];
      _value.B3 = _buffer[_internalCursor++];

      result = _value.Int32;
      return this;
    }

    public ByteBuffer Float(float value)
    {
      _value.Float = value;
      _buffer[_internalCursor++] = _value.B0;
      _buffer[_internalCursor++] = _value.B1;
      _buffer[_internalCursor++] = _value.B2;
      _buffer[_internalCursor++] = _value.B3;
      return this;
    }

    public ByteBuffer Float(out float result)
    {
      _value.B0 = _buffer[_internalCursor++];
      _value.B1 = _buffer[_internalCursor++];
      _value.B2 = _buffer[_internalCursor++];
      _value.B3 = _buffer[_internalCursor++];
      result = _value.Float;
      return this;
    }
  }
}
Top

Using The ByteBuffer Class

Using the ByteBuffer class is fairly straightforward. Simply call the constructor with a byte array and offset. No data can be read or written before the offset.

A sample test/driver program now follows...

static void Main(string[] args)
{
  byte[] data = new byte[128];
  ByteBuffer buffer = new ByteBuffer(data, 5);

  Int16 v1 = Int16.MaxValue - 1067;
  Int32 v2 = Int32.MaxValue - 10067;
  float v3 = float.MaxValue - 1.07896f;

  int bytesWritten = buffer
    .Int16(v1)
    .Int32(v2)
    .Float(v3)
    .Cursor;
  Console.WriteLine($"{bytesWritten} bytes written to buffer.");

  int bytesRead = buffer
    .SetCursor(0)
    .Int16(out var v1Read)
    .Int32(out var v2Read)
    .Float(out var v3Read)
    .Cursor;

  Console.WriteLine($"{bytesRead} bytes read from buffer.");
  Console.WriteLine($"v1Write:{v1} - v1Read:{v1Read}");
  Console.WriteLine($"v2Write:{v2} - v2Read:{v2Read}");
  Console.WriteLine($"v3Write:{v3} - v3Read:{v3Read}");
}

The above code wites the following to the console.

Notice how the test program uses an offset of 5 when constructing the ByteBuffer. The correct bytes read/wrriten of ten is still returned. The first five bytes in this example will be zeroed.

Top

Wednesday, 23 November 2022

Functional Library - Errors

The success path for any given application is an easy path follow. Problems arise when errors need to be dealt with. I am of the mindset that exceptions are significantly different to errors. An exception, is typically a showstopper, null pointer exception, stack-overflow exception, out of memory exceptions. These type of exceptions usually result in a program crash and graceful handling can be difficult.

The other end of the scale consists of errors that one can typically handle without detrimental effect to the application. Examples include incorrect input, failure to connect to a database, a socket etc. The latter examples might be down to network failures so retries may be possible. In contrast one cannot perform a retry if an exception is raised (assuming the above exceptions).

Like I say this is not easy! There are other issues. Exceptions create a stack trace, extremely useful for debugging. Manual error handling offers no such gifts and can make debugging much harder.

In this post...

Exceptions vs Manual Error Handling

To avoid complexity, let's keep things simple. Exceptions denote exceptional events, null pointers, stack overflows, out of memory, etc. So, essentially, system errors. Typically, exceptions of the aforementioned results in program failure.

In contrast errors denote problems that do NOT necessarily result in program failure. Examples and possible solutions follow...

  • Entering an invalid email address. In this scenario, one could just prompt user to enter a new (valid) email address.
  • Database connection failure. The database might be offline, network maybe down. One could save transactional data to a file to be run later. This is a tricky problem and depends upon the database transaction that was about to occur. Context is the key, one needs to view the impact on the application.
  • Socket connection failure. Same techniques for database failure might be applied. Retry strategies in both scenarios will be required.
Top

Functions

Functions generate results or perform an action. Typically, in OO solutions, actions do not yield a result and may, instead throw an exception upon failure. Whilst throwing an exception might be the way forward, function signatures typically do not state that an exception may be thrown. Typically, one must read supporting documentation to reveal if a function may throw an exception. Throughout my career I have encountered code that calls a function and ignores any exceptions that might be thrown. This especially tends to be the case if said function can throw any number of exceptions.

I do not think exceptions are a bad thing, however, I do believe they are misused and a better mechanism is required.

Top

Function Honesty

Consider the following function...

int Divide(int number, int divisor)
{
  return number / divisor;
}

Clearly, if the divisor is zero a divide by zero exception will be thrown. Of course the function signature does not convey this. How can we deal with this type of scenario? I believe there are three ways...

  • Return a sentinel value
    In this case NaN.
  • Throw a divide by zero exception.
  • Return a result which either contains a valid value or a reason as to why the function failed.

Analysing the above I would come to the following conclusions...

  • The NaN informs me that the function resulted in a non-number, doesn't tell me why, but, at least I know the function failed. In this simple example one could probably fathom that the function failed as the divisor was zero. Functions exist in numerous libraries that use sentinel values where usage may not be so obvious.
  • The exception informs me why the function failed. However, I might not be in the correct place to catch and respond to the exception. Also, the function does not state that it might throw an exception. So, why would I be inclined to respond to exceptions.
  • The result solution, in this case, might be best. I can call the function and act accordingly upon the result. If the result denotes success, on my merry way I go. If the result denotes failure, I might retry, log the error and fail gracefully, maybe try a different execution path. Best of all, the function signatures indicates that the function may succeed or fail.

Now, consider the following function declaration...

int GetChar();

Most will understand that char is short for character. As such, one might assume that the function returns a character. However, this is clearly not the case as the function returns an int (signed integer). The reason for this is that -1 is a sentinel value that indicates end of file. Of course you will only know this if you read the documentation and said documentation is both accurate and up to date. Personally, I think a better way to to handle this situation is to use some kind of iterator. For example...

class ReadCharacters{
  public bool IsEof {get; private set;}
  public char Current { get; private set; }
  
  public bool Next()
  {
    int ch = GetChar();
    if (ch == -1)
    {
      IsEof = true;
      return false;
    }
    Current = (char)ch;
    return true;
  }
}

I am not going to pretend that the above code is foolproof. However, I think it conveys more information than "GetChar" and is harder to misuse. Both are good properties that help produce code with fewer bugs.

Top

Saturday, 19 November 2022

Performance Testing

Often in software development one needs to determine which algorithm is more performant. The easiest way to do this, in C#, is to use the Stopwatch class. To ensure fairly accurate results, it is best to run each algorithm N times and take the average. Even so, results are not entirely accurate as the first run will be cold. That is, currently, the JIT compiler may not have been enacted. My own test results show that that the first run tends to be slowest. Subsequent runs tend to be much faster (in the same session).

Regardless of the above, timings are useful enough to determine performant algorithms.

In this post...

Goals

With any software project, no matter the size, some planning is always worthwhile. So, for this project I want the following...

  • Easy test specification, e.g. test name and a function pointer to the test.
  • Specify the number of times each test should be run.
  • Obtain the total time for all test runs and the average run time.
  • The ability to obtain test results as a string.
Top

Analysis

Given the above requirements the following can be stated.

  • Each test is named and timed.
  • Each test is run N times, from this one can deduce the total runtime and average runtime.
  • One may run multiple tests and each test may be run N times. From this one can deduce that an array of sorts will be required.
Top

Design

Given the requirements and preliminary analysis we can proceed to perform some basic design.

Let's start with the idea of a test. A test simply consists of a name and a function pointer. Something like...

Test(string name, Func<object> func)

The function pointer expects the function to return an object. This leaves it open-ended and will prove useful to ensure that in release mode functions are not removed. Release mode in most languages will remove functions that appear useless.

Next we need a structure that holds the results of a single test run N times. We might call this TestGroupResult. The structure should maintain the test name, total elapsed time (for the N runs, and the average time per test run). Such a structure might be as follows...

TestGroupResult(string name, TimeSpan totalElapsedTime, TimeSpan averageElapsedTime)

For the next step we need a structure that maintains the entire result set. That is all the group test results. Again, for each test we run said test N times to obtain a total elapsed time and average times. The result is the TestGroupResult. Let's name this new structure BenchmarkResult...

BenchmarkResult(int runsPerTest, GroupResult[] results)

Finally, we need an entry point, where we specify the tests to run and the number of times each test should be run. It makes sense to call this entry point Benchmark.

Benchmark.Run(string name, Func<object> func)

To create an instance we might run the following code.

internal class Program
{
  static void Main(string[] args)
  {
    var result = Benchmark.Run(10,
      ("Test1", () => { Thread.Sleep(500); return 1; }),
      ("Test2", () => { Thread.Sleep(400); return 2; })
    );

    Console.WriteLine(result.GenerateReport());    
  }
}

Using the above code, my console output is as follows..

Top

Source code

using System;
using System.Collections.Generic;
using System.Diagnostics;
using System.Text;

namespace Fun.Benchmarking
{
  /// <summary>
  /// Encapulates a group of tests.
  /// Maintains the total elapsed time and average elapsed time.
  /// Generate a report as a string.
  /// </summary>
  public class TestGroupResult
  {
    public string Name { get; }
    public TimeSpan TotalElapsedTime { get; }
    public TimeSpan AverageElapsedTime { get; }

    public TestGroupResult(
      string name,
      TimeSpan totalElapsedTime,
      TimeSpan averageElapsedTime)
    {
      this.Name = name;
      this.TotalElapsedTime = totalElapsedTime;
      this.AverageElapsedTime = averageElapsedTime;
    }

    public StringBuilderGenerateReport(StringBuilder sb)
    {
      return sb
        .AppendLine($"Test Name : {Name}")
        .AppendLine($"  Total Elapsed Time: {TotalElapsedTime}")
        .AppendLine($"  Total Average Time: {AverageElapsedTime}");
    }
  }

  /// <summary>
  /// Represents a benchmark result which includes...
  /// The number of runs for each supplied test.
  /// An array of test group results (a group is a single test run N times).
  /// </summary>
  public class BenchmarkResult
  {
    public int RunsPerTest { get; }
    public TestGroupResult[] GroupResults { get; }

    public BenchmarkResult(
      int runsPerTest,
      TestGroupResult[] groupResult)
    {
      this.RunsPerTest = runsPerTest;
      this.GroupResults = groupResult;
    }

    public string GenerateReport()
    {
      StringBuilder sb = new StringBuilder();
      sb.AppendLine($"Runs Per Test: {RunsPerTest}");
      foreach (TestGroupResult groupResult in GroupResults)
        groupResult.GenerateReport(sb);
      return sb.ToString();
    }
  }

  /// <summary>
  /// The Benchmark allows one to determine the performance of an algorithm.
  /// Multiple algorithms may be tested, great for determining which algorithm performs best.
  /// </summary>
  public class Benchmark
  {
    /// <summary>
    /// Run one or more tests and specify how many times each test should be run.
    /// The total and average elapsed time for each test will be calculated.
    /// </summary>
    /// <param name="runsPerTest">How many times each test should be run.</param>
    /// <param name="tests">An array of tests to be run.</param>
    /// <returns></returns>
    public static BenchmarkResult Run(
      int runsPerTest,
      params (string Name, Func<object> Code)[] tests)
    {
      List<TestGroupResult> groups = new List<TestGroupResult>();
      foreach (var test in tests)
      {
        TestGroupResult group = RunTestGroup(runsPerTest, test);
        groups.Add(group);
      }
      return new BenchmarkResult(runsPerTest, groups.ToArray());
    }

    /// <summary>
    /// Run a single test (N runsPerTest) times.
    /// </summary>
    /// <param name="runsPerTest"></param>
    /// <param name="test"></param>
    /// <returns></returns>
    public static TestGroupResult RunTestGroup(
      int runsPerTest,
      (string Name, Func<object> Code) test)
    {
      Stopwatch stopwatch = Stopwatch.StartNew();
      for (int testCount = 0; testCount < runsPerTest; testCount++)
      {
        test.Code();        
      }
      stopwatch.Stop();
      TimeSpan elapsedTime = stopwatch.Elapsed;
      return new TestGroupResult(test.Name, elapsedTime, new TimeSpan>(elapsedTime.Ticks/runsPerTest));
    }
  }
}

Friday, 23 September 2022

Displaying Raw Data In A Grid - Winforms

So, I wanted a way to quickly display data in Winforms (C#). Granted, we have ListView, but I hate the ceremony involved to populate a ListView. So, I decided to develop something similar to a ListView, but with a more econimcal API. I think I achieved that. Not quite as hard as you may think. I called my new control View, whch exists within the UI.UIGrid namespace.

In this post...

Top

1. Grid View Goals

  • Simple API
  • Fast
  • Extendible

My first take meets the first two criteria.

Top

2. Test Data

As with all things software, testing is key. For this particular solution a list of something is required. I opted for a simple list of customers. where the list count may be specified. The code for the test suite follows.

Top

2.1 Customer

using System;

namespace UI.App.DataAccess
{
  public class Customer
  {
    public string FirstName { get; }
    public string LastName { get; }
    public DateTime DOB { get; }

    public Customer(
      string firstName,
      string lastName,
      DateTime dob)
    {
      this.FirstName = firstName;
      this.LastName = lastName;
      this.DOB = dob;
    }
  }
}

Top

2.2. Customer Mock Data

using System;
using System.Collections.Generic;

namespace UI.App.DataAccess
{
  public static class MockData
  {
    public static IEnumerable<Customer> Random(int count)
    {
      DateTime start = new DateTime(1995, 1, 1);
      int range = (DateTime.Today - start).Days;

      for (int i=0; i<count; i++)
      {
        yield return new Customer(
          $"First{i}",
          $"Last{i}",
          start.AddDays(i));
      }
    }
  }
}
Top

3. Grid View As A User Control

Figure 1: Grid View

The above image illustrates the components of the grid view. The grid view consists of a User Control that contains the following...

  1. A header (UIColumns in this case)
    UIColumns is a Panel control that is used to display individual coumns. UIColumns overrides the Paint event.
  2. A rows view (a Panel derived view)
    No surprises here, the rows view is responsible for painting row data.
Top

3.1. Using the Grid View

To use my grid control, from say, a form, I used the following code...

protected override void OnLoad(EventArgs e)
{
  new UIGrid.View()
  {
    Parent = this,
    Dock = DockStyle.Fill,
  }
  .WithColumn("First Name", 80)
  .WithColumn("Last Name", 80)
  .WithColumn("DOB", 80)
  .WithData(
  DataAccess.MockData.Random(50000),
  (c, cells) =>
  {
    cells[0] = c.FirstName;
    cells[1] = c.LastName;
    cells[2] = c.DOB.ToString("dd/MM/yyyy");
  });
}
Top

3.2. Grid View Output

So, the expected output of my grid view is as follows...

Let's introduce some concepts...

  • The view will have columns.
  • The view will have rows where each row's width is specified by its column.
  • Each row will contain one or more cells, essentially strings for now.

4. Implementation

In this section I will show/discuss the implementation used to realise my original concept. Here goes...

Top

4.1. Column

using System;

namespace UI.UIGrid
{
  public class Column
  {
    public string Title { get; }
    public int Width { get; }
    
    public Column(
      string title,
      int width)
    {
      this.Title = title;
      this.Width = width;
    }

    public override string ToString() =>
      $"{Title}, {Width}";
  }
}

The column class is simple, it simply stores the column title and the column width.

Top

4.2. Rows

namespace UI.UIGrid
{
  public class Row
  {
    public View View { get; }
    public string[] Cells { get; }

    public Row(
      View view,
      string[] cells)
    {
      this.View = view;
      this.Cells = cells;
    }
  }
}

The row class is also simple. It maintains a back pointer to the View, and a collection of cells (strings). An array of strings is used to optimise lookup.

Top

4.3. Rows View

using System.Windows.Forms;

namespace UI.UIGrid
{
  public partial class RowsView : Panel
  {
    public RowsView()
    {
      InitializeComponent();
      DoubleBuffered = true;
      ResizeRedraw = true;
    }
  }
}
Top

4.4. View

The view class is reponsible for drawing columns and rows, and processing events. One could create separate, panel-derived classes, one for columns and one for rows. The problem with this approach is sharing data between the different controls. My approach simplifies data exchange (all in one class, the View) at the expense of slightly more verbose code. Software, always trade offs!

using System;
using System.Collections.Generic;
using System.Drawing;
using System.Linq;
using System.Windows.Forms;

namespace UI.UIGrid
{
  public partial class View : UserControl
  {
    /// <summary>
    /// Two controls, one for columns, one for rows.
    /// Allow easy access to scroll info, given a control.
    /// </summary>
    public struct ScrollInfo
    {
      public int X;
      public int Y;

      public ScrollInfo(int x, int y)
      {
        this.X = x;
        this.Y = y;
      }

      public static ScrollInfo FromControl(Panel c)
      {
        return new ScrollInfo(
          -c.AutoScrollPosition.X,
          -c.AutoScrollPosition.Y);
      }
    }

    private readonly List<Column>; _columns = new List<Column>();
    private readonly List<Row> _rows = new List<Row>();
    private readonly Color _gridColor = Color.Gainsboro;
    private int _rowHeight;

    public View()
    {
      InitializeComponent();
      UIColumnsInit();
      UIRowsInit();
      _rowHeight = Font.Height + 4;
    }

    public View WithColumn(string title, int width)
    {
      _columns.Add(new Column(title, width));
      return this;
    }

    public View WithData<T>(
      IEnumerable<T> data,
      Action<T, string[]> mapRowCells)
    {
      _rows = data
        .Select(r =>
        {
          string[] row = new string[_columns.Count];
          mapRowCells(r, row);
          return new Row(this, row);
        }).ToList();
      return this;
    }

    private void UIColumnsInit()
    {
      UIColumns.Height = Font.Height;
      UIColumns.Paint += UIColumns_Paint;
    }

    private void ForceColumnsRepaint()
    {
      UIColumns.Invalidate();
      UIColumns.Update();
    }

    private void UIColumns_Paint(object sender, PaintEventArgs e)
    {
      e.Graphics.TranslateTransform(
        UIRows.AutoScrollPosition.X,
        0);

      Rectangle rcCol = new Rectangle(
        UIColumns.ClientRectangle.Left,
        UIColumns.ClientRectangle.Top,
        0,
        UIColumns.ClientRectangle.Height);

      _columns.ForEach(col =>
      {
        rcCol.Width = col.Width;
        e.Graphics.DrawString(col.Title, Font, Brushes.White, rcCol);
        e.Graphics.DrawLine(Pens.Gainsboro, rcCol.Right - 1, rcCol.Top, rcCol.Right - 1, rcCol.Bottom);
        rcCol.X = rcCol.Right;
      });
    }

    private void UIRowsInit()
    {
      UIRows.Paint += UIRows_PaintNaive;
      UIRows.Scroll += UIRows_Scroll;
      UIRows.Resize += (e, s) => ForceColumnsRepaint();
    }

    private void UIRows_Scroll(object sender, ScrollEventArgs e)
    {
      // Force columns to repaint upon a horizontal scroll event.
      if (e.ScrollOrientation == ScrollOrientation.HorizontalScroll)
        ForceColumnsRepaint();
    }

    /// <summary>
    /// Paint vertical grid lines in UIRows control.
    /// </summary>
    /// <param name="g"></param>
    /// <returns>Total columns width.</returns>
    private int PaintVerticalGridLines(
      Graphics g,
      Color lineColor,
      int yScroll)
    {
      int right = 0;
      using (Pen pen = new Pen(lineColor, 1))
      {
        _columns.ForEach(c =>
        {
          right += c.Width;
          g.DrawLine(
            pen,
            right - 1,
            UIRows.DisplayRectangle.Top,
            right - 1,
            UIRows.DisplayRectangle.Bottom + yScroll);
        });
      }
      >return right;
    }

    private void PaintRow(
      Graphics g,
      Pen gridPen,
      Font font,
      Rectangle rcRow,
      int xScroll,
      Row row)
    {
      Rectangle rcCell = rcRow;
      rcCell.X = 0;
      for (int cell = 0; cell < _columns.Count; cell++)
      {
        rcCell.Width = _columns[cell].Width;
        g.DrawString(row.Cells[cell], font, Brushes.Black, rcCell);
        rcCell.X = rcCell.Right;
      }
      g.DrawLine(gridPen, rcRow.Left, rcCell.Bottom, rcRow.Right + xScroll, rcCell.Bottom);
    }

    private void UIRows_PaintNaive(object sender, PaintEventArgs e)
    {
      e.Graphics.TranslateTransform(
        UIRows.AutoScrollPosition.X,
        UIRows.AutoScrollPosition.Y);

      ScrollInfo si = ScrollInfo.FromControl(UIRows);
      Rectangle rcDisp = UIRows.ClientRectangle;
      Rectangle rcRow = new Rectangle(0, 0, DisplayRectangle.Width + si.X, _rowHeight);
      rcDisp.Offset(-UIRows.AutoScrollPosition.X, -UIRows.AutoScrollPosition.Y);

      int yPos = 0;
      using (Pen penGrid = new Pen(_gridColor, 1))
      {
        for (int row = 0; row < _rows.Count; row++)
        {
          rcRow.Y = yPos;
          PaintRow(e.Graphics, penGrid, Font, rcRow, si.X, _rows[row]);
          yPos += _rowHeight;
        }
      }

      int right = PaintVerticalGridLines(e.Graphics, Color.Gainsboro, si.X);
      UIRows.AutoScrollMinSize = new Size(right, _rows.Count * _rowHeight);
    }

    private void UIRows_Paint(object sender, PaintEventArgs e)
    {      
      e.Graphics.TranslateTransform(
        UIRows.AutoScrollPosition.X,
        UIRows.AutoScrollPosition.Y);

      ScrollInfo si = ScrollInfo.FromControl(UIRows);      
      Rectangle rcDisp = UIRows.ClientRectangle;
      Rectangle rcRow = new Rectangle(0,0,DisplayRectangle.Width + si.X,_rowHeight);
      rcDisp.Offset(-UIRows.AutoScrollPosition.X, -UIRows.AutoScrollPosition.Y);      

      int yPos = 0;
      using (Pen penGrid = new Pen(_gridColor, 1))
      {
        for (int row = 0; row < _rows.Count; row++)
        {
          rcRow.Y = yPos;
          if (rcRow.IntersectsWith(rcDisp))
            PaintRow(e.Graphics, penGrid, Font, rcRow, si.X, _rows[row]);
          yPos += _rowHeight;
        }
      }

      int right = PaintVerticalGridLines(e.Graphics, Color.Gainsboro, si.X);
      UIRows.AutoScrollMinSize = new Size(right, _rows.Count * _rowHeight);
    }
  }
}
Top

Code Analysis

Most of the code should be easy enough to follow. However, some may have noticed that I have two row paint methods, namely, UIRows_PaintNaive and UIRows_Paint. One is optimal and the other is sub-optimal and, for large row counts will appear to update slowly. Of course, one could argue that displaying more than, say, a 1000 rows is not ideal. It is probably better to offer a search or paging mechanism. Still, sometimes, for debugging purposes, algorithmic purposes, displaying a large row count might be useful.

In both cases, the document size is calculated. The UIRows control's AutoScrollMinSize is updated to reflect the document size. Note, while the AutoScrollMinSize is updated, I refrain from setting AutoScroll to true. I noticed, during development and testing that AutoScroll set to true can cause problems. The header is repainted if the user performs a horizontal scroll.

One can view the overall painting process as a view within a larger view. This is typically known as a viewport. A viewport is simply the visible area within a document that is too big to display in its entirety. One can actually envisage a viewport as an actual window. If you look straight ahead out of a window you will get one perspective. If you now move your head, and say, bend at you your knees, you will see an entirely different perspective. The point is, you cannot see all there is too see out of your window. To see more you must reorient yourself, or invest in a larger window.

The above diagram illustrates considerations required when painting a document that is much larger than the available display size.

The following analyses the two different row paint approaches.

Naive Paint Method

The naive paint method iterates and draws all rows. The Operating System will clip accordingly. However, calculations are still performed for each row. Also, clipping will increase the time required to process each row.

As one might expect, this is the least performant approach, as we attemptto calculate, and paint all rows, regardless of whether or not they fall within the viewport area.
Tuesday, 12 July 2022

Tree Data Structures

In this post I will explain an important data structure, "The Tree". Trees are versatile data structures that are used in many algorithms, from abstract syntax trees, to the HTML DOM your Web browser uses.

Top

A Basic Tree Data Structure

Diagram 1 illustrates that a tree is simply a collection of nodes. How the nodes are layed out and, the information a given node contains, is specific to the problem being solved.

Some basic observations about a tree data structure are...

  • A tree always contains a single, top-level node, known as the root.
  • Any given tree node can have zero or more child nodes. (E.g. The root node in diagram 1, contains three child nodes)
  • Any given node has a level. In diagram 1, the root is defined as being at level 1.

Top

A Tree Structure In Code

Given that we know a node may contain zero or more children. How can we represent this in code? One way might be to have each node contain a collection of child nodes. The collection might be an array or list of nodes. A list, of course allows us to add more child nodes without having to resize the collection as with an array. Under the hood, a list will resize itself as nodes are added.

The list approach is commonly used, however, having a list instance for each node can impact the memory footprint.

As always with software, there are tradeoffs and one needs to consider the problem domain and problem size to determine the best fit.

Diagram 2 illustrates how to implement a tree structure, where child nodes are stored within a list. As is often the case in software, adding a level of indirection is key. Here, the indirection is a list that stores child nodes for any given node. As already noted, this approach can prove to be expensive in terms of memory usage. Each node must contain an instance of the list class, even if the node contains no child nodes.

Top

Self-Describing Tree Structure

Most of the time, using data structures provided by your development platform are fine. Other times, however, one needs to rethink, go back to basics and develop a more streamlined solution. Developing custom data structures to fit a niche is not a new idea.

Diagram 3 illustrates a tree structure that is fully described using a node structure. That is, no need for a separate list data structure to store child nodes.

Diagram 3 also illustrates the following...

  • Implements a doubly-linked list, allowing one to forward or reverse traverse sibling nodes.
  • Each node has a pointer to its parent node.
  • A node containing children has a pointer to its first child node and to its last child node. This caters for efficient insertion of removal of nodes.

This particular structure is optimal in the sense that only the node data required is stored. A node does not require a list or array to store child nodes. This does complicate the implementation somewhat, but, I think is worthwhile to ensure minimal memory usage.

Analysis allows us to determine that a node basically consists of a previous and next sibling. This essentially describes a doubly-linked list. The first and last child pointers describe how a node collection might describe a collection of nodes.

Top

Self-Describing Tree Source Code

Analysis of the self-describing tree structure leads to two separate records. The first describes a simple node, that contains pointers to previous and next siblings. The second, describes a node that contains the first and last child nodes, essentially a collection of nodes. The following C# code illustrates how these ideas might be implemented. Records, in C# are best represented using classes or structs.

The following is the code for a Node (C#). Note, all members could just be declared as public fields. Using private members and separate accessor functions allows us to add additional functionality. This might include raising events when the tree structure is modified.


public class Node
{
  private NodeContainer _parent;
  private Node _previousSibling;
  private Node _nextSibling;

  public Node Parent =>
    _parent;

  public Node PreviousSibling =>
    _previousSibling;

  public Node NextSibling =>
    _nextSibling;

  public void SetParent(NodeContainer container)
  {
    _parent = container;
  }

  public void SetPreviousSibling(Node prev)
  {
    _previousSibling = prev;
  }

  public void SetNextSibling(Node next)
  {
    _nextSibling = next;
  }
}
Top

The next code snippet describes a node container. As one might expect, a node container, contains zero or more nodes. Code is included to append a node to an existing node. The code also includes an All method. This method returns all nodes, using a depth-first tree search.


public class NodeContainer : Node
{
  private Node _firstChild;
  private Node _lastChild;

  public IEnumerable<Node> All()
  {
    Stack<Node> stack = new Stack<Node>();
    stack.Push(this);

    while (stack.Count > 0)
    {
      Node cur = stack.Pop();
      yield return cur;

      if (cur is NodeContainer container)
      {
        Node curSib = container._lastChild;

        while (null != curSib)
        {
          stack.Push(curSib);
          curSib = curSib.PreviousSibling;
        }
      }       
    }
  }

  public void Append(Node node)
  {
    node.SetParent(this);

    if (null == _firstChild)
    {
      _firstChild = node;
      _lastChild = node;
      node.SetNextSibling(null);
      node.SetPreviousSibling(null);
    }
    else
    {
      node.SetPreviousSibling(_lastChild);
      node.SetNextSibling(null);
      _lastChild.SetNextSibling(node);
      _lastChild = node;
    }
  }
}
Top

Summary

This post only scratches the surface when discussing tree data structures.

Tree, in software are found in many places. Examples include...
  • Abstract Syntax Trees - the result of parsing program text.
  • Expression trees - the result of parsing an expression.
  • HTML DOM - as used by a web browser.