Showing posts with label NET. Show all posts

Sunday, 3 September 2023

Simple List Control - Part 1

Overview

In this post I will detail how to create a Windows Forms application that hosts a simple list control. The list control is akin to the ListBox control but developed from scratch. This tutorial will start with basics, creating the necessary control(s), painting and so on. The tutorial will then discuss slightly more advanced topics such as scrolling, paint optimisation, selection and so on.

In this post

Project Creation

We will create a WinForms project to host the simple list control. For this project I am using Visual Studio Community Edition 2022. The project targets .NET Framework 4.8.

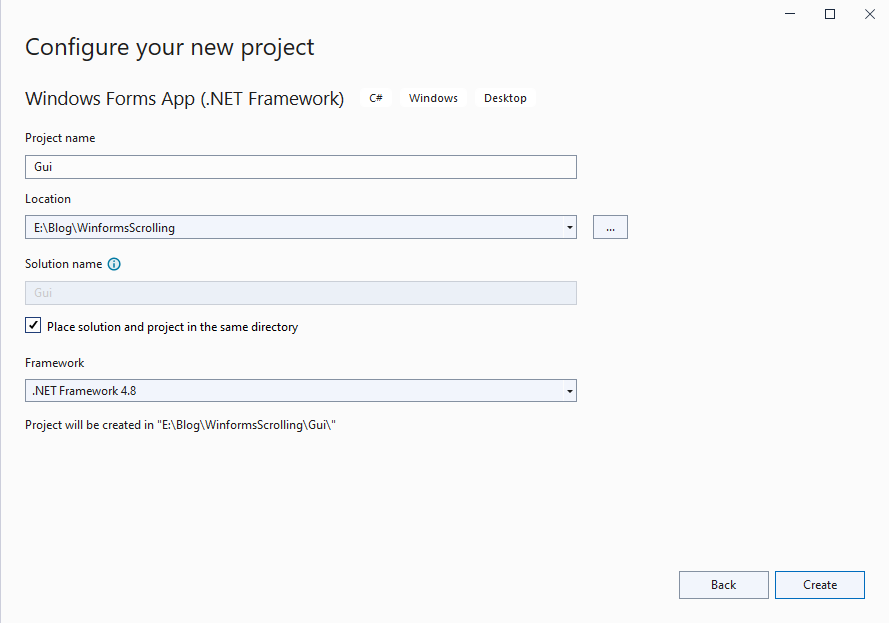
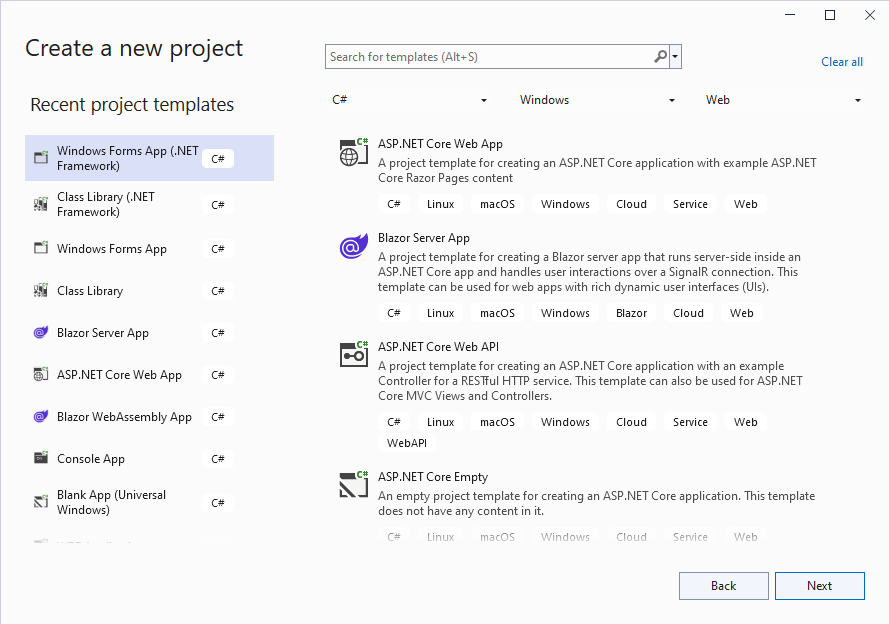
1. Create a new Winforms project (.NET Framework).

Figure 1 - Creating the project

2. Configure the project.

Figure 2 - Configuring the project

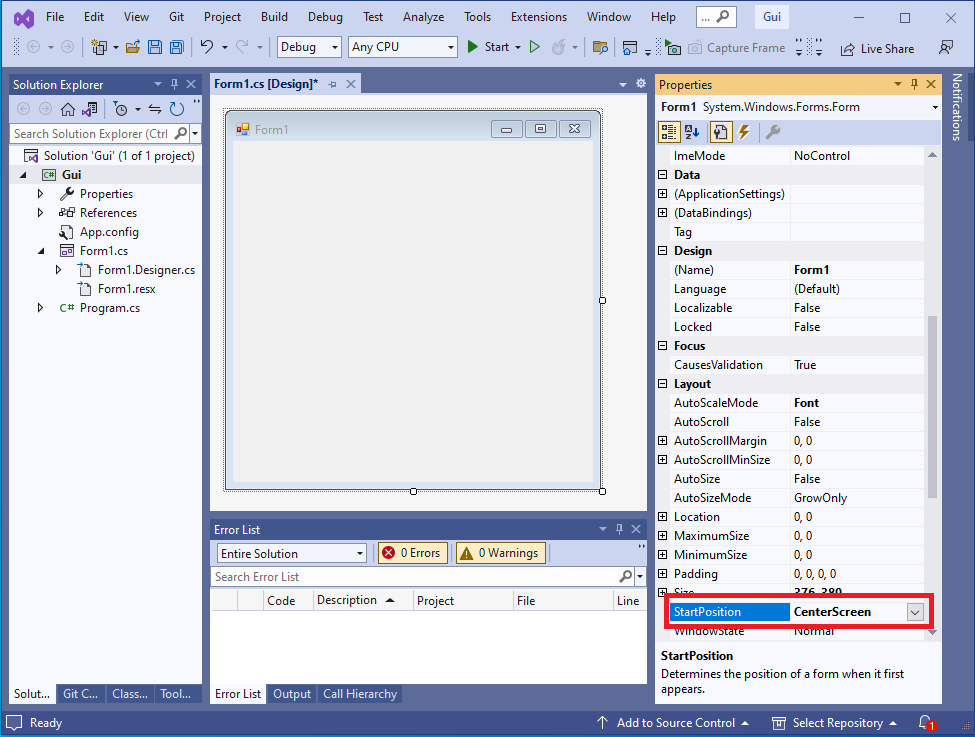
3. Configure the main form properties.

This step is optional, the defaults will suffice. I prefer to ensure that the form will display center screen.

Figure 3 - Configuring the main form
Top

Adding A User Control

A User Control will be used to host the simple list control. The control will implement painting, scrolling, selection and so on.

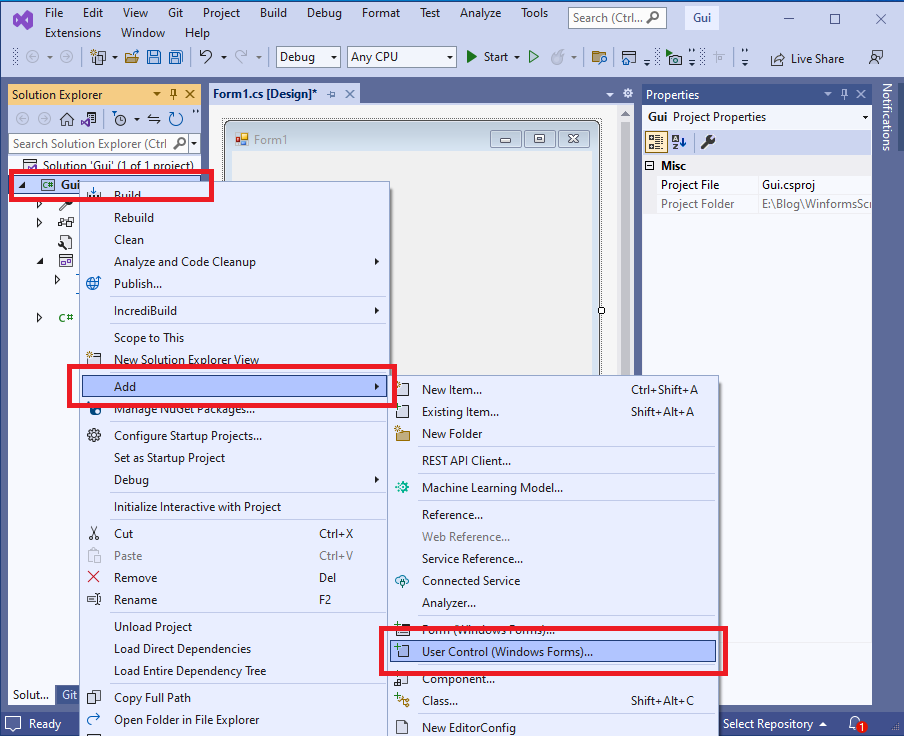
1. Add a new user control

Figure 4 - Add a new user control

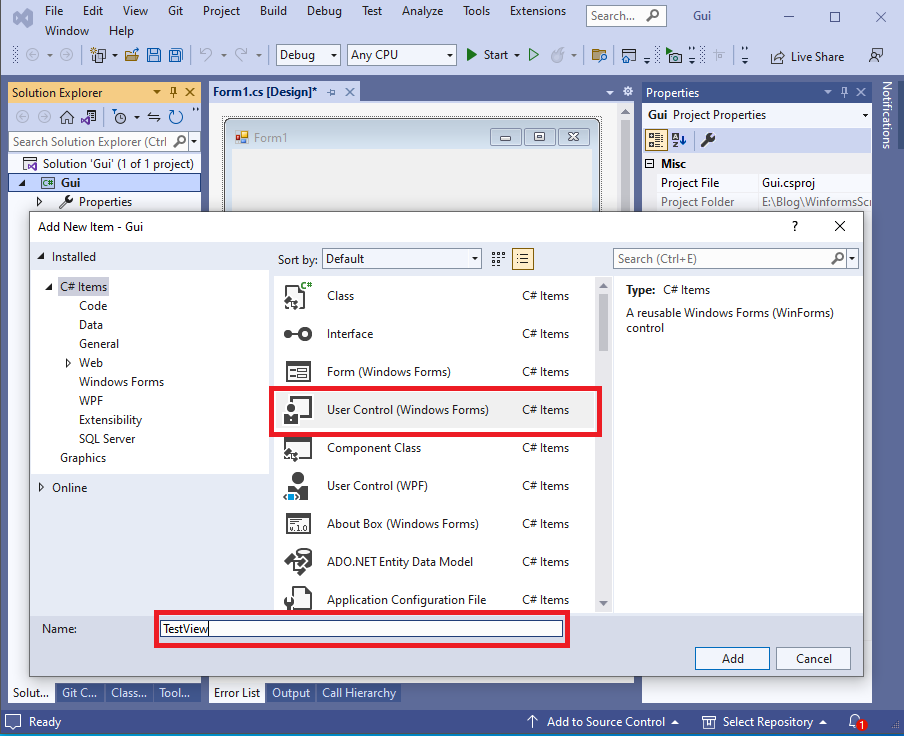
2. Name the user control

I've chosen to name the control TestView. You can name the control anything you wish. However, you will need to make changes to subsequent code to reflect your chosen name.

Figure 5 - Name the new user control

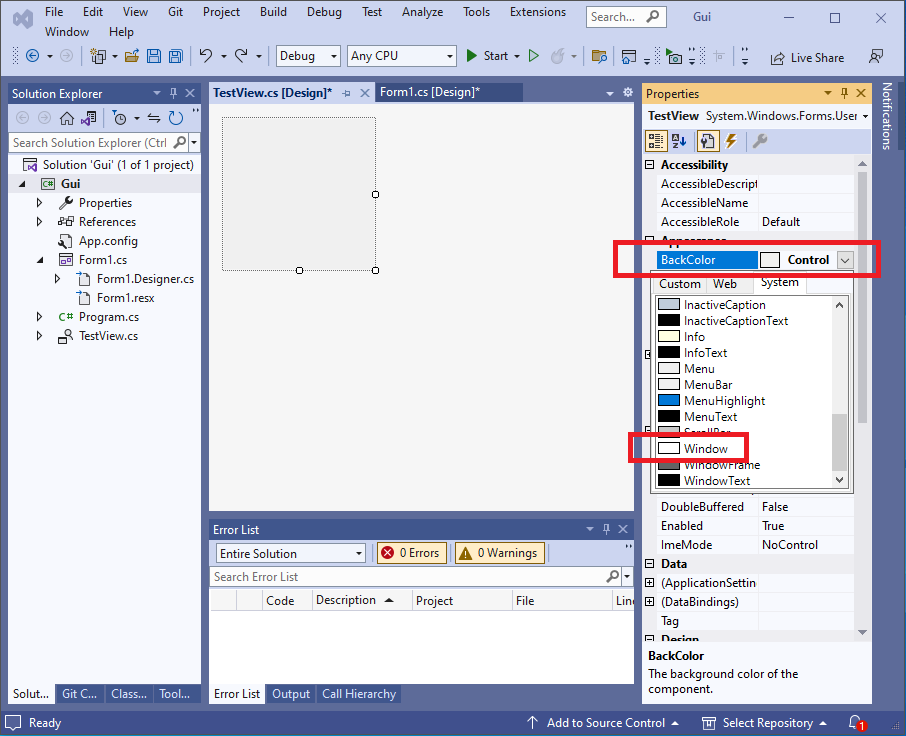
3. Configure the user control

To configure the user control, simply change the background colour to Window (default colour being white).

Figure 6 - Configure the user control
Top

Adding The User Control To The Main Form

1. First build the project to ensure the the user control is ready for use. In Solution Explorer, right-click the Gui project the select build or press the F6 key.

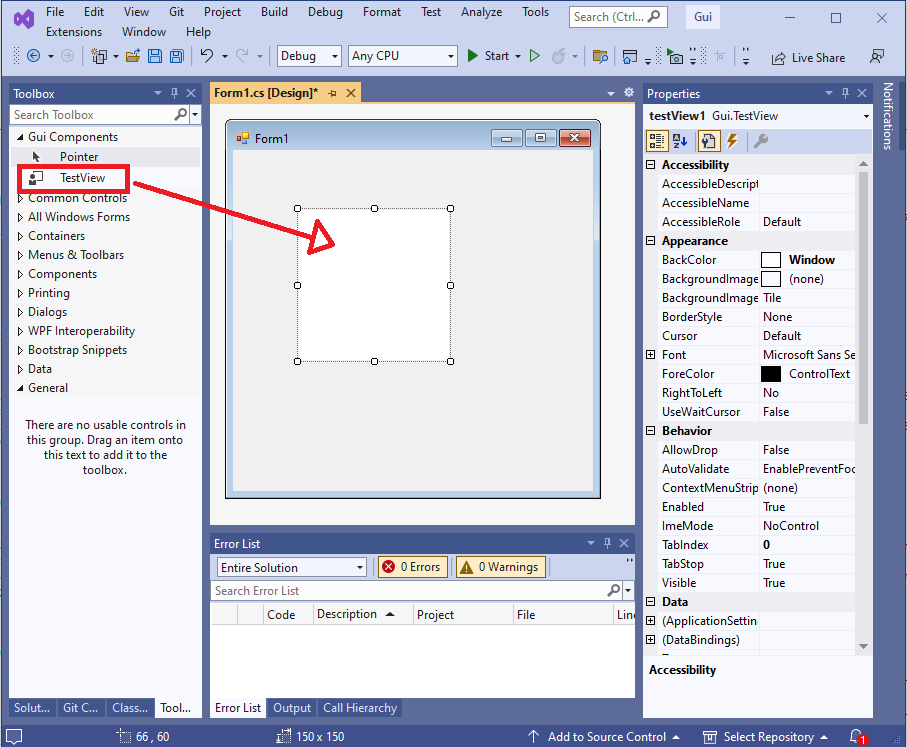
2. Switch to the Toolbox tab and drag the TestView component to the main form.

Figure 7 - Main form hosting the user control

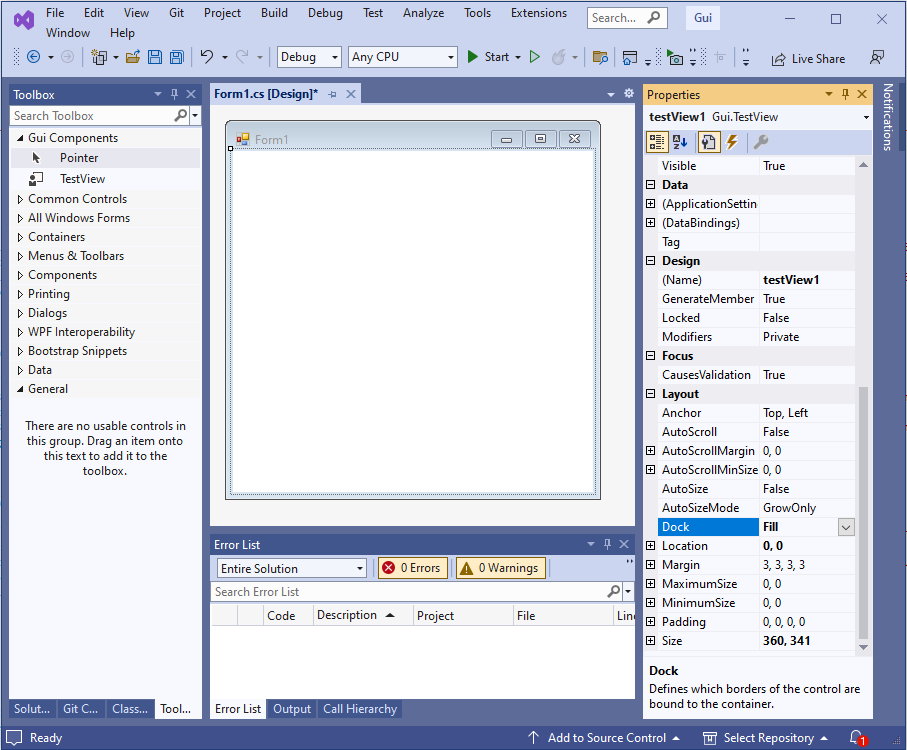
3. Finally, select the user control then select the dock property and change to Fill.

Figure 8 - User control docked to main form
Top

Summary

In this post I described the initial steps for creating a simple list control. To ensure the post does not become to long, I concentrated on creating and configuring the project. I then proceeded to add a user control that will house the list control's functionality. In the next post we will start writing code to implement list view functionality.

Top

Sunday, 15 January 2023

Working-With-Byte-Arrays

In this post I will show how to read/write different data type values to and from a byte buffer. This should prove useful when working with block data or pages. In this scenario, pages describes database pages or similar block data mechanisms.


Top

In this post...

Top

How To Handle Typed Values

The aim is to read/write different typed values from a byte array. In C++ one can achieve this by using a union. In C# we achieve this by using a struct/class using explicit layout. Explicit layout is the key here as it ensures types are aligned correctly.

The basic idea is to have a number of byte values offset from zero to maximum bytes required. Then add basic types, such as int 16, int 32, int 64, float, etc all at offset zero. Then one can set a float value and read of the four byte values. The same can be done for most basic types, set the value and the read the corresponding byte values. To read typed values, simply populate the byte values accordingly then read the basic type info (int 16, int 32, int float, etc).

For those with a COM background this approach is similar to the VARIANT type.

Top

The Union Value Type


using System;
using System.Runtime.InteropServices;
namespace Blog
{
  [StructLayout(LayoutKind.Explicit)]
  public struct Value
  {
    [FieldOffset(0)] public byte B0;
    [FieldOffset(1)] public byte B1;
    [FieldOffset(2)] public byte B2;
    [FieldOffset(3)] public byte B3;
    [FieldOffset(4)] public byte B4;
    [FieldOffset(5)] public byte B5;
    [FieldOffset(6)] public byte B6;
    [FieldOffset(7)] public byte B7;

    [FieldOffset(0)] public float Float;
    [FieldOffset(0)] public double Double;
    [FieldOffset(0)] public Int16 Int16;
    [FieldOffset(0)] public Int32 Int32;
    [FieldOffset(0)] public Int64 Int64;
  }
}

The above struct declaration shows eight bytes, B0-B7 for data transfer. If using the decimal type this will need to be expanded to include 16 bytes! As can be seen, B0-B7 is byte aligned and offset accordingly.

Note also, that basic types float, double, Int16, etc all start at offset zero. So, if one sets the Float field, the corresponding 4 bytes can be read from B0-B3. To reverse the action, set fields B0-B3, then read the float value.

It is imperative that one knows how many bytes are required for a typed value. The above structure should cover most data types bar decimal. DateTime values can also be stored by first converting to long and using the Int64 field or bytes B0-B7 to recreate.

Top

Testing The Union Value Type

The above can be tested using the following code...

static void RawTest()
{
  Value value = new Value();
  byte[] data = new byte[128];

  int cursor = 0;
  
  // *********************************************************************************************
  // Writing values to the data byte array.
  // *********************************************************************************************
  Int16 v1 = Int16.MaxValue - 1067;
  Int32 v2 = Int32.MaxValue - 10067;
  float v3 = float.MaxValue - 1.07896f;

  // Write an Int16 value to the data byte array.
  // First set the Value's Int16 field, then read two Value bytes.
  value.Int16 = v1;
  data[cursor++] = value.B0;
  data[cursor++] = value.B1;

  // Write an Int32 value to the data byte array.
  // First set the Value's Int32 field, then read four Value bytes.
  value.Int32 = v2;
  data[cursor++] = value.B0;
  data[cursor++] = value.B1;
  data[cursor++] = value.B2;
  data[cursor++] = value.B3;

  // Write a float value to the data byte array.
  // First set the Value's Float field, then read four Value bytes.
  value.Float = v3;
  data[cursor++] = value.B0;
  data[cursor++] = value.B1;
  data[cursor++] = value.B2;
  data[cursor++] = value.B3;

  
  // *********************************************************************************************
  // Reading values from the data byte array.
  // *********************************************************************************************
  cursor = 0;
  
  // Read an Int16 from the data byte array.
  // Set Value's first two byte fields, then read the Value's Int16 field.
  value.B0 = data[cursor++];
  value.B1 = data[cursor++];
  var v1Result = value.Int16;

  // Read an Int32 from the data byte array.
  // Set Value's first four byte fields, then read the Value's Int32 field.
  value.B0 = data[cursor++];
  value.B1 = data[cursor++];
  value.B2 = data[cursor++];
  value.B3 = data[cursor++];
  var v2Result = value.Int32;

  // Read a float from the data byte array.
  // Set Value's first four byte fields, then read the Value's Float field.
  value.B0 = data[cursor++];
  value.B1 = data[cursor++];
  value.B2 = data[cursor++];
  value.B3 = data[cursor++];
  var v3Result = value.Float;

  Console.WriteLine(v1);
  Console.WriteLine(v1Result);
  Console.WriteLine(v2);
  Console.WriteLine(v2Result);
  Console.WriteLine(v3);
  Console.WriteLine(v3Result);
}
Top

Writing Values To A Byte Array

Figure 2 illustrates a byte array filled with values from the previous test code. As the diagram illustrates, data values are byte aligned accordingly. That is, a 16 bit-integer requires 2 bytes, a float or 32-bit integer requires 4 bytes. This approach works well for data blocks comprising of byte arrays. Simply create a byte array, write values and save to disk. Conversely, load a byte array block from disk into memory, then proceed to read actual values.

Top

Improving The Value Interface

The current method of reading/writing values is somewhat verbose. One needs to track the byte array offset (cursor) and the offset to add following a read or write. In addition, explicitly reading and writing to the Value's byte fields (B0...BN) is tiresome and error-prone. The following should help alleviate these problems...

  • Specify the byte array and initial offset.
  • Specify a cursor that is relative to the specified initial offset.
  • Update the cursor accordingly following a read or write operation.
  • Allow the cursor's position to be set manually, the cursor will always be relative to the specified offset.

The following class, ByteBuffer, implements the above features.

using System;

namespace Blog
{
  /// <summary>
  /// Allows values to read/written to/from a byte array.
  /// Specify a byte buffer and initial offset in the constructor.
  /// Data will be read/written at this offset.
  /// The class uses a cursor to indicate current read/write position.
  /// The cursor is always offset by the offset specified in the constructor.
  /// </summary>
  public class ByteBuffer
  {
    private Value _value = new Value();
    private int _internalCursor;
    private int _offset;
    private readonly byte[] _buffer;

    public int Cursor => _internalCursor - _offset;

    public ByteBuffer(byte[] buffer, int offset)
    {
      _buffer = buffer;
      _offset = offset;
      _internalCursor = offset;
    }

    public ByteBuffer SetCursor(int position)
    {
      _internalCursor = _offset + position;
      return this;
    }

    public ByteBuffer Int16(Int16 value)
    {
      _value.Int16 = value;
      _buffer[_internalCursor++] = _value.B0;
      _buffer[_internalCursor++] = _value.B1;
      return this;
    }

    public ByteBuffer Int16(out Int16 result)
    {
      _value.B0 = _buffer[_internalCursor++];
      _value.B1 = _buffer[_internalCursor++];
      result = _value.Int16;
      return this;
    }

    public ByteBuffer Int32(Int32 value)
    {
      _value.Int32 = value;
      _buffer[_internalCursor++] = _value.B0;
      _buffer[_internalCursor++] = _value.B1;
      _buffer[_internalCursor++] = _value.B2;
      _buffer[_internalCursor++] = _value.B3;
      return this;
    }

    public ByteBuffer Int32(out Int32 result)
    {
      _value.B0 = _buffer[_internalCursor++];
      _value.B1 = _buffer[_internalCursor++];
      _value.B2 = _buffer[_internalCursor++];
      _value.B3 = _buffer[_internalCursor++];

      result = _value.Int32;
      return this;
    }

    public ByteBuffer Float(float value)
    {
      _value.Float = value;
      _buffer[_internalCursor++] = _value.B0;
      _buffer[_internalCursor++] = _value.B1;
      _buffer[_internalCursor++] = _value.B2;
      _buffer[_internalCursor++] = _value.B3;
      return this;
    }

    public ByteBuffer Float(out float result)
    {
      _value.B0 = _buffer[_internalCursor++];
      _value.B1 = _buffer[_internalCursor++];
      _value.B2 = _buffer[_internalCursor++];
      _value.B3 = _buffer[_internalCursor++];
      result = _value.Float;
      return this;
    }
  }
}
Top

Using The ByteBuffer Class

Using the ByteBuffer class is fairly straightforward. Simply call the constructor with a byte array and offset. No data can be read or written before the offset.

A sample test/driver program now follows...

static void Main(string[] args)
{
  byte[] data = new byte[128];
  ByteBuffer buffer = new ByteBuffer(data, 5);

  Int16 v1 = Int16.MaxValue - 1067;
  Int32 v2 = Int32.MaxValue - 10067;
  float v3 = float.MaxValue - 1.07896f;

  int bytesWritten = buffer
    .Int16(v1)
    .Int32(v2)
    .Float(v3)
    .Cursor;
  Console.WriteLine($"{bytesWritten} bytes written to buffer.");

  int bytesRead = buffer
    .SetCursor(0)
    .Int16(out var v1Read)
    .Int32(out var v2Read)
    .Float(out var v3Read)
    .Cursor;

  Console.WriteLine($"{bytesRead} bytes read from buffer.");
  Console.WriteLine($"v1Write:{v1} - v1Read:{v1Read}");
  Console.WriteLine($"v2Write:{v2} - v2Read:{v2Read}");
  Console.WriteLine($"v3Write:{v3} - v3Read:{v3Read}");
}

The above code wites the following to the console.

Notice how the test program uses an offset of 5 when constructing the ByteBuffer. The correct bytes read/wrriten of ten is still returned. The first five bytes in this example will be zeroed.

Top
Saturday, 9 April 2022

Tokenisation

In this post I demonstrate how one can take a character input stream and generate tokens. Tokens generated can be used for another stage. The next stage might be to compile your own language, to parse CSV files. My tokeniser simply serves as a starting point.

In This Post


Top

What is tokenisation

Simply put, tokenisation, takes a character input stream and outputs tokens.

Tokens might include numbers, identifiers that may be part of a programming language, and so on. Essentially, a tokeniser groups characters into more meaningful constructs.

Assume a given character stream contains the characters

int x = 22

A tokeniser would recognise 'int' as an identifier (or word). The same can be said about 'x'. The '=' (Equals) symbol would be recognised as a special symbol. The digits '22' would be recognised as a number. In short, the tokenised output for the supplied text might be...

Identifier:Identifier:Special:Number

Top

Tokenisation Project

The project is a NET 6.0 console application. The default namespace is Lex.V1.

Token Types

Token types, (numbers,identifiers, special characters, etc) are listed as an enumeration. This ensures client(s) (e.g. parser) can switch on token types required.


namespace Lex.V1
{
  public enum TokenType
  {
    Eof,
    Error,

    IsValidToken,

    Comma,
    LeftParen,
    RightParen,
    LeftBrace,
    RightBrace,
    Colon,
    Semicolon,

    Equals,
    EqualsEquals,

    Plus,
    PlusEquals,
    PlusPlus,

    Identifier,
    Integer,
  }
}
Top

The Tokeniser Class


using System.Text;

namespace Lex.V1
{
  /// <summary>
  /// Class to turn a character stream into tokens.
  /// </summary>
  public class Tokeniser
  {
    private const char Eof = char.MinValue;

    private readonly TextReader _reader;
    private readonly StringBuilder _text = new();
    private char _char;

    public UInt64 Integer { get; private set; }

    public string Text =>
      _text.ToString();

    /// <summary>
    /// Need a way to read characters from a text stream.
    /// The TextReader class seems suitable.
    /// </summary>
    /// <param name="reader"></param>
    public Tokeniser(TextReader reader)
    {
      _reader = reader;

      // Require lookahead of one character.
      _char = ReadChar();
    }

    /// <summary>
    /// Eat whitespace and return next token.
    /// Return Eof, if at end of character stream.
    /// </summary>
    public TokenType Next()
    {
      // Ignore whitespace.
      if (char.IsWhiteSpace(_char))
        EatWhitespace();

      if (_char == Eof)
        return TokenType.Eof;

      // Clear text for each token run.
      _text.Clear();

      // Identifiers are most common, try them first.
      if (char.IsLetter(_char) || ('_' == _char))
        return BuildIdentifier();

      // Check if digit and parse a number.
      if (char.IsDigit(_char))
        return BuildNumber();

      // default token type is an error.
      TokenType tt = TokenType.Error;

      // Generate token types from characters that are not identifiers or numbers.
      switch (_char)
      {
        case Eof: return TokenType.Eof;
        case '(': return Special(TokenType.LeftParen);
        case ')': return Special(TokenType.RightParen);
        case '{': return Special(TokenType.LeftBrace);
        case '}': return Special(TokenType.RightBrace);
        case ',': return Special(TokenType.Comma);
        case ';': return Special(TokenType.Semicolon);
        case ':': return Special(TokenType.Colon);

        case '+':
          tt = Special(TokenType.Plus);
          if (_char == '=')
            return Special(TokenType.PlusEquals);
          if (_char == '+')
            return Special(TokenType.PlusPlus);
          return tt;

        case '=':
          tt = Special(TokenType.Equals);
          if (_char == '=')
            return Special(TokenType.EqualsEquals);
          return tt;
      }

      _text.Append(_char);
      return TokenType.Error;
    }

    private char ReadChar()
    {
      int result = _reader.Read();
      return (-1 == result) ? Eof : (char)result;
    }

    private void EatWhitespace()
    {
      while (char.IsWhiteSpace(_char))
        _char = ReadChar();
    }

    private TokenType BuildIdentifier()
    {
      while (char.IsLetter(_char) || char.IsDigit(_char) || ('_' == _char))
      {
        _text.Append(_char);
        _char = ReadChar();
      }
      return TokenType.Identifier;
    }

    /// <summary>
    /// Just supporting integers for now.
    /// </summary>
    private TokenType BuildNumber()
    {
      Integer = 0;
      while (char.IsDigit(_char))
      {
        Integer *= 10;
        Integer += (UInt64)(_char - '0');
        _char = ReadChar();
      }
      return TokenType.Integer;
    }

    private TokenType Special(TokenType tt)
    {
      _text.Append(_char);
      _char = ReadChar();
      return tt;
    }
  }
}
Top

Test program

The test program contains sample text to tokenise.


namespace Lex.V1
{
  public sealed class Test
  {
    const string Text =
    "int Add(int v1, int v2)\n" +
    "{\n" +
    "  return v1 + v2;\n" +
    "}\n" +
    "\n" +
    "int Main()\n" +
    "{\n" +
    "  int x = 2000 + 46;\n" +
    "  int y = 4096;\n" +
    "  int z = 1;" +
    "  z++;" +
    "  return Add(x, y);\n" +
    "}";

    public static void Run()
    {
      // Load text and loop until erroror end of stream.
      using StringReader sr = new(Text);
      Tokeniser tokeniser = new(sr);
      TokenType tt = tokeniser.Next();

      Console.WriteLine(Text);

      while (tt > TokenType.IsValidToken)
      {
        Console.WriteLine($"{tokeniser.Text} 	: {tt}");
        tt = tokeniser.Next();
      }

      if (tt == TokenType.Error)
        Console.WriteLine($"Error: {tokeniser.Text}");
    }
  }
}
Top

Driver Program

The following code runs the tokeniser, The code is located in program.cs. Due to latest C# compiler, no need for Program class or Main method, it is implied.


Lex.V1.Test.Run();
Top

Sample Output

Click/select image to see details

Friday, 14 May 2021

Functional Programming

What is functional programming?

Functional programming places functions first. All aspects of the resultant software is built upon functions. In contrast, Object-Oriented development places objects first. In this case, objects encapsulate state and potentially, behaviour. In functional programming, data and behaviour are typically kept separate. In my experience, the two techniques can be summarised as follows.

  • Object-Oriented

    Well-suited for user interface development as widgets (e.g. buttons, text input, etc) can maintain state such as text, event handlers for when say a button is clicked or text is editied.

    Data types such as stacks, queues, dictionaries, etc. Managing state and exposing behaviour in single place makes sense.

  • Functional

    Better suited where partitioning state across different objects is non-sensical or becomes problematic.

    Data types are complex, for example invoice processing, game state and so on. More complex data types are better manipulated using functions rather than "attaching" functions to the data type (Functions attached to a data type are typically known as methods in Object-Oriented development).

Top

What is a function?

A function accepts one or more inputs and generates a single output. It is also possible for a function to accept zero inputs and just return a value. The main take should be that a function can only create an output based upon the input values supplied. This is important! What this means is that a function cannot use outside state (global state) to generate an output. A function that only uses supplied inputs to generate an output is known as a Pure Function

Top

How do I code a good function?

To create a solid, sound function that can be reasoned about ceratin rules must be followed.

  • Use pure functions

    As mentioned, a pure function generates an output based purely upon its inputs. Using global state is forbidden. Pure functions go a step further, executing code that produces any side-effects is forbidden. This includes writing to the console, writing to log files, updating a database. In short, a pure function should always produce the same output given the supplied inputs. No side-effects, no using global variables. In pure functional programming even throwing exceptions is no go. Makes sense as throwing an exception is a side-effect which goes against the notion of a pure function.

    An exception is really just a goto on steriods. Exceptions can make following program flow and debugging difficult. Well-written software shouldn't need debugging. Sure, debugging a new function whilst still in development is likely a must. Once the function has been tested you should be able to trust it and move on.

    There are ways to implement state changes whilst still adhering to the rules. I shall go into details later,

  • Use immutable data

    Mutable data is data than can change in place. I remember my C/C++ days when dealing with strings. It was common to modify existing strings. This is more performant than creating new string based upon old strings.

    Times have changed, as have data structures, memory and so on. Immutable data is now the way forward. This essentially means once you have created some data, an object, record whatever your language permits, it never changes. If you need different values, you create new data, possibly based upon the original data.

    Take some simple data, the data represents X and Y coordinates in 2D space. Using C#, the code to represent the data is as follows.

    
    public struct Point
    {
      // get and set are C# constructs that allow one to set or get a data value.
      // get allows one to read a data value.
      // set allows one to update (write to) a data value.
      public int X { get; set; }
      public int Y { get; set; }
    
      public Point(int x, int y)
      {
        this.X = x;
        this.Y = y;
      }
    
      public void Offset(int xOffset, int yOffset)
      {
        this.X += xOffset;
        this.Y += yOffset;
      }
    }
    

    Now assume the following test class

    
    public static class TestPoint
    {
      public static void Test1()
      {
        Point pt = new Point(20, 40);
        pt.X = 1000;
        pt.Offset(0,20);
        // pt now contains the values x=1000 and y=60.
      }
    }
    
    Top

    In the above code, pt was created to have an X value of 20 and a Y value of 40. The second statement assignes 1000 to X. This directly modifies the pt variable. This is known as in-place modification. The ability to modify data content in-place makes the data structure mutable. The code also contains an Offset method. This method adds x and y offsets to the existing data.

  • How do I refactor mutable code to immutable code?

    In this case, the transition from mutable to immutable code is easy. Make all data fields readonly and supply a constructor to initialise the data fields. The following code example illustrates the idea.

    
    public struct Point
    {
      // A field that contains only a get construct is deemed to be readonly.
      // The field value may only be assigned via the constructor.
      public int X { get; }
      public int Y { get; }
    
      public Point(int x, int y)
      {
        this.X = x;
        this.Y = y;
      }
    
      public Point WithOffset(int xOffset, int yOffset)
      {
        return new Point(X + xOffset, Y + yOffset);
      }
    }
    
    public static class TestPoint
    {
      public static void Test1()
      {
        // Create a pt variable as per previous example.
        Point pt = new Point(20, 40);
        
        // Unable to modify the pt variable as fields are readonly.
        // We need to create a new data, i.e. a new instance of Point.
        // We create a new point by adding 1000 to the current X and zero to the Y value.
        Point ptNew = pt.WithOffset(1000, 0);
      }
    }


    Notice how the new code doesn't quite behave in the same way as the previous code. In the previous code we directly set the X value to a 1000. To achieve the same result in the new, immutable data we need to add a new function, let's call it WithX.

    public struct Point
    {
      // A field that contains only a get construct is readonly.
      // The field value may only be assigned via the constructor.
      public int X { get; }
      public int Y { get; }
    
      public Point(int x, int y)
      {
        this.X = x;
        this.Y = y;
      }
    
      public Point WithOffset(int xOffset, int yOffset)
      {
        return new Point(X + xOffset, Y + yOffset);
      }
      
      public Point WithX(int x)
      {
        return new Point(x, Y);
      }
    }
    
    
Top