Showing posts with label Winforms. Show all posts

Sunday, 3 September 2023

Simple List Control - Part 1

Overview

In this post I will detail how to create a Windows Forms application that hosts a simple list control. The list control is akin to the ListBox control but developed from scratch. This tutorial will start with basics, creating the necessary control(s), painting and so on. The tutorial will then discuss slightly more advanced topics such as scrolling, paint optimisation, selection and so on.

In this post

Project Creation

We will create a WinForms project to host the simple list control. For this project I am using Visual Studio Community Edition 2022. The project targets .NET Framework 4.8.

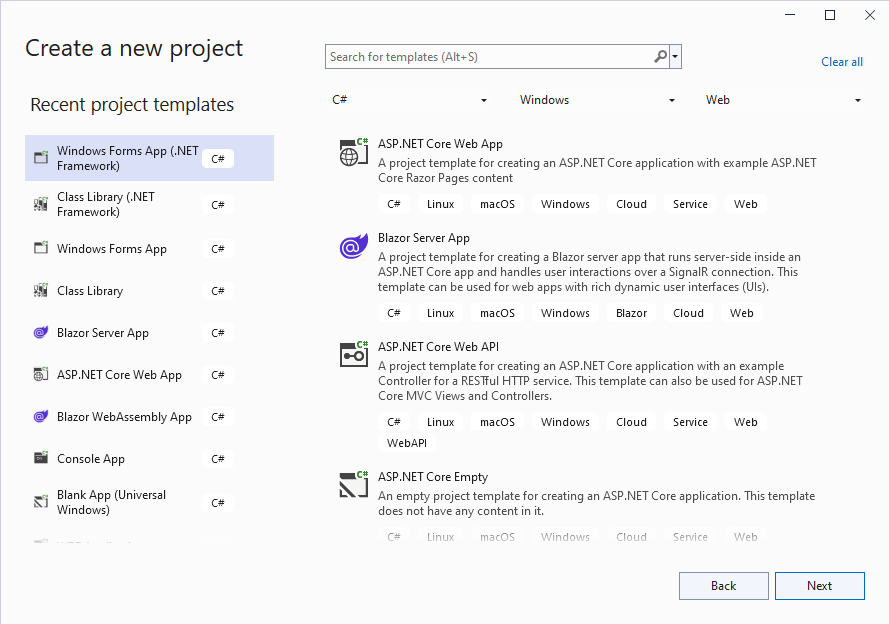
1. Create a new Winforms project (.NET Framework).

Figure 1 - Creating the project

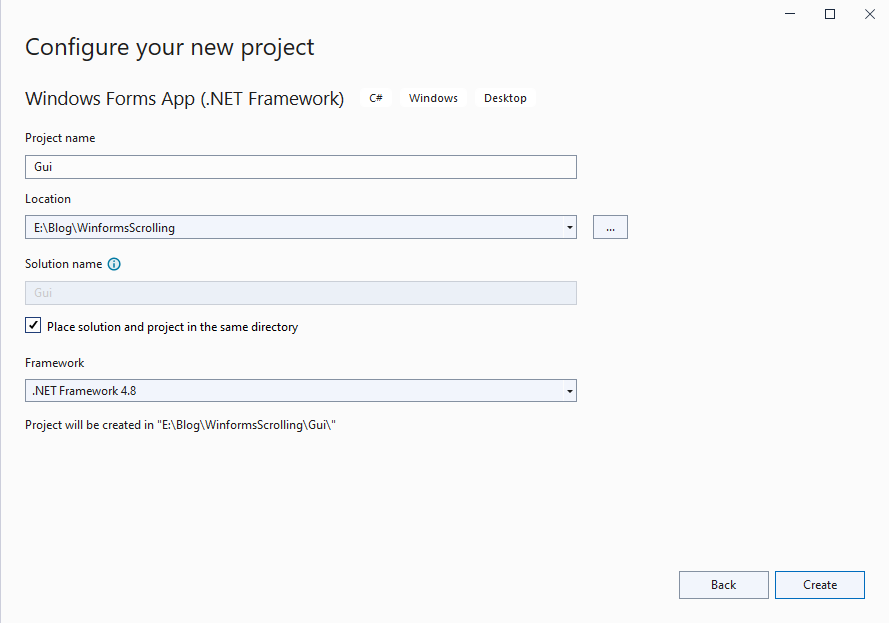
2. Configure the project.

Figure 2 - Configuring the project

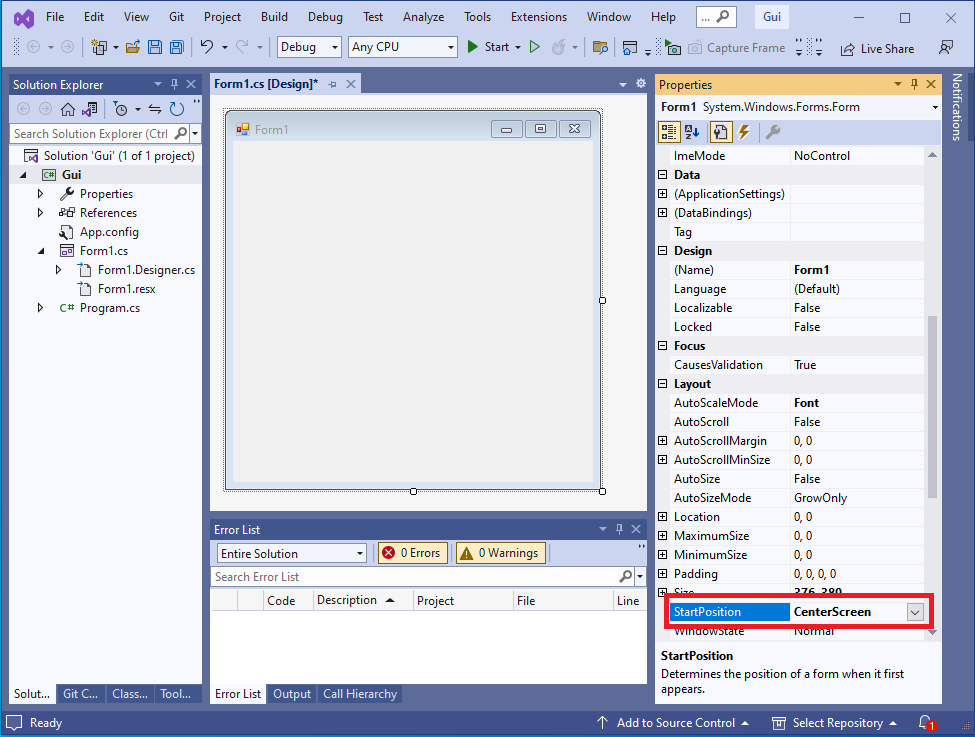
3. Configure the main form properties.

This step is optional, the defaults will suffice. I prefer to ensure that the form will display center screen.

Figure 3 - Configuring the main form
Top

Adding A User Control

A User Control will be used to host the simple list control. The control will implement painting, scrolling, selection and so on.

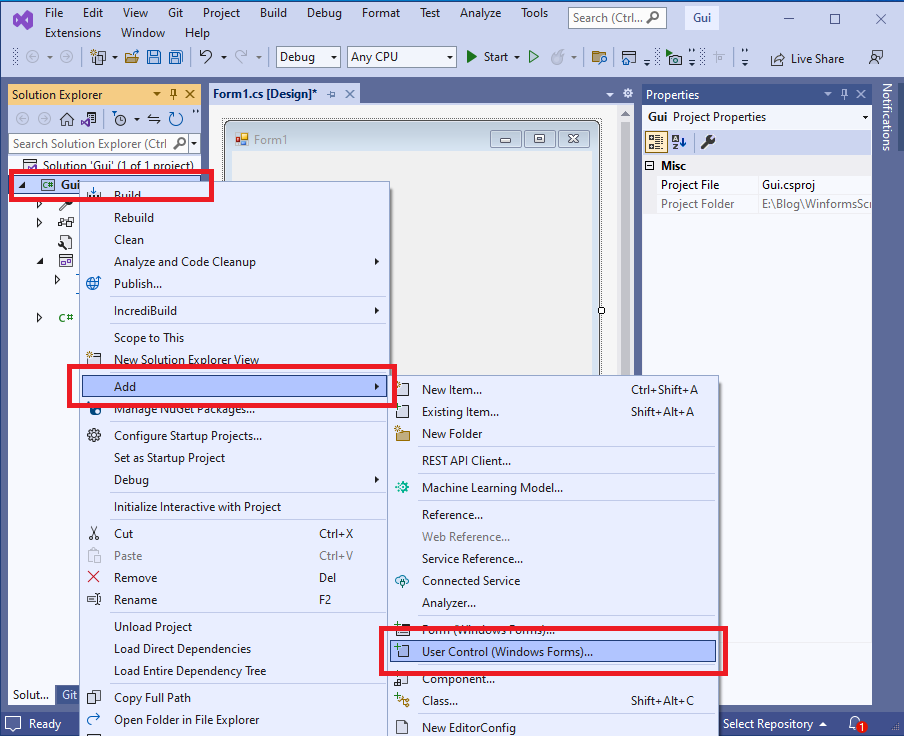
1. Add a new user control

Figure 4 - Add a new user control

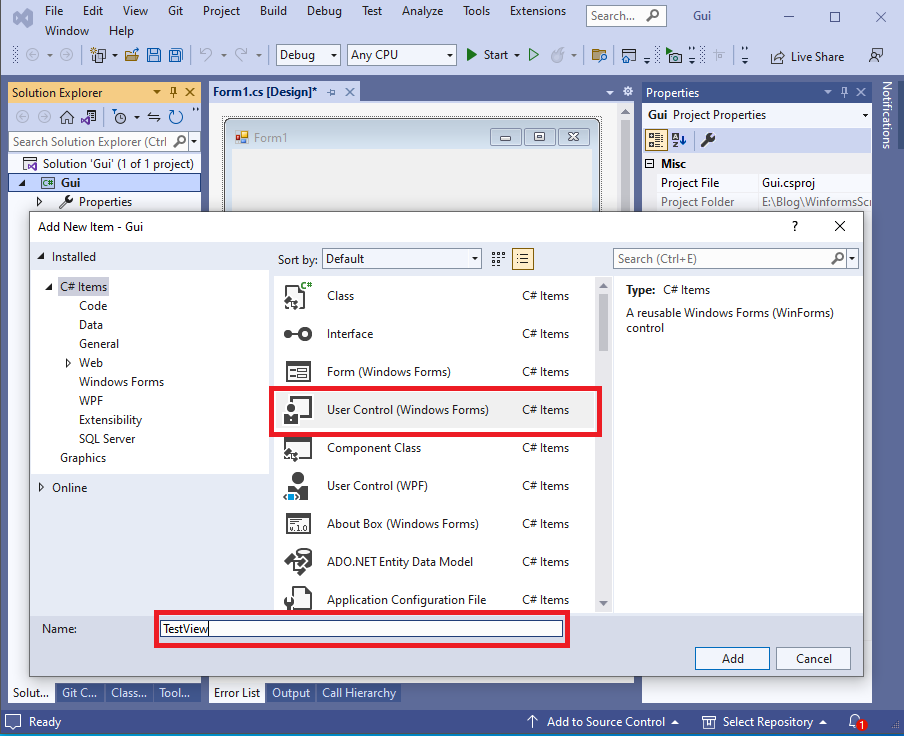
2. Name the user control

I've chosen to name the control TestView. You can name the control anything you wish. However, you will need to make changes to subsequent code to reflect your chosen name.

Figure 5 - Name the new user control

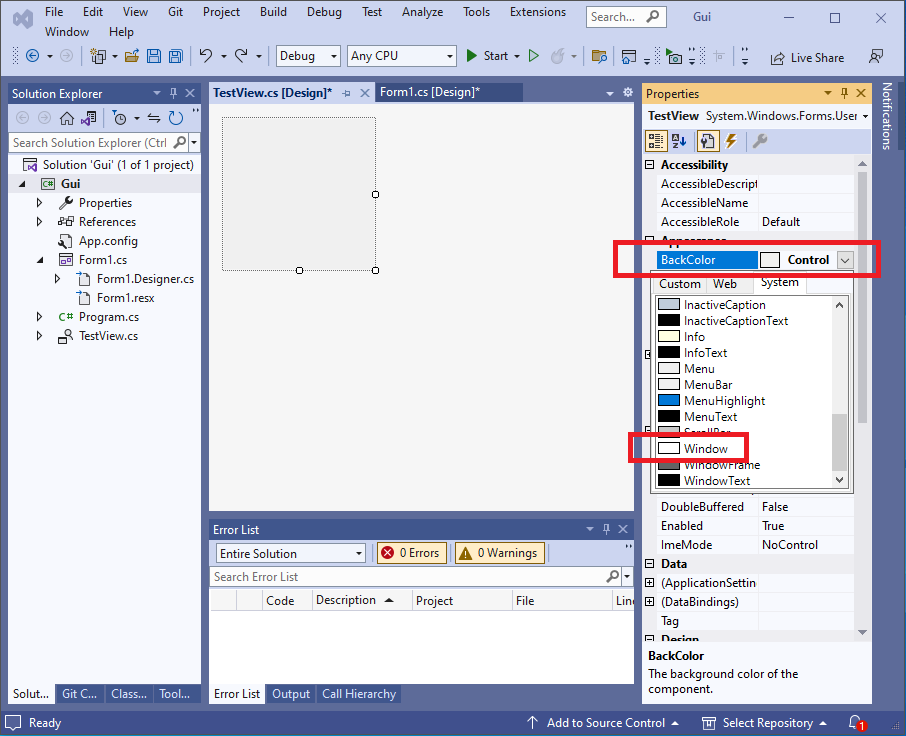
3. Configure the user control

To configure the user control, simply change the background colour to Window (default colour being white).

Figure 6 - Configure the user control
Top

Adding The User Control To The Main Form

1. First build the project to ensure the the user control is ready for use. In Solution Explorer, right-click the Gui project the select build or press the F6 key.

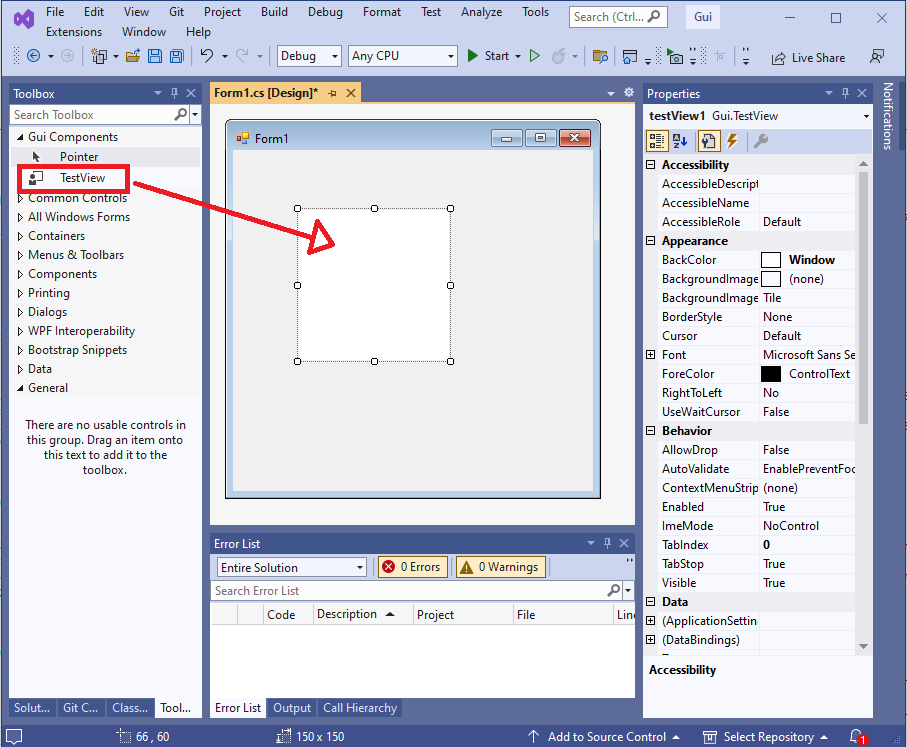
2. Switch to the Toolbox tab and drag the TestView component to the main form.

Figure 7 - Main form hosting the user control

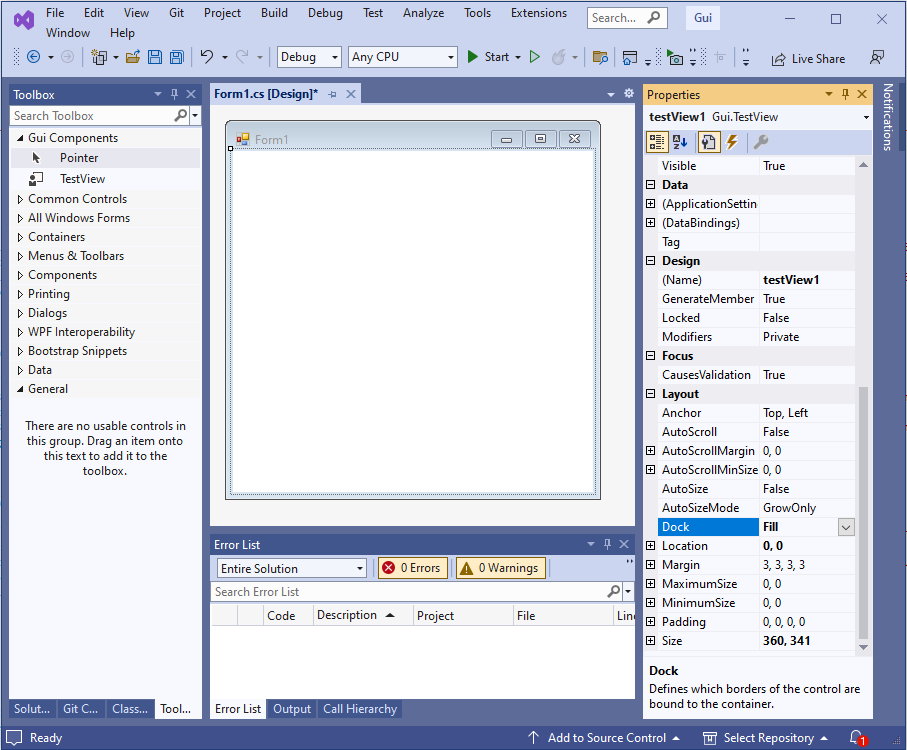
3. Finally, select the user control then select the dock property and change to Fill.

Figure 8 - User control docked to main form
Top

Summary

In this post I described the initial steps for creating a simple list control. To ensure the post does not become to long, I concentrated on creating and configuring the project. I then proceeded to add a user control that will house the list control's functionality. In the next post we will start writing code to implement list view functionality.

Top

Simple List Control - Part 2

Overview

In my previous post I detailed the steps required to create WinForms project that will eventually house a simple list control.

This post discusses how to implement basic row painting. A brief overview of the Windows painting mechanism is included.

In this post...

Top

Basic Winforms Painting Mechanics

Typically, all painting in a WinForms control is performed by responding to the Paint event. In a derived control overriding the OnPaint method achieves the same result. ALL painting should occur within the OnPaint method. Whilst creating a graphics context within a control is possible, it is generally frowned upon.

Windows raises a paint event whenever a control is resized, or a portion is uncovered, say, after moving another window over the control. It is also possible to cause Windows to raise the paint event manually, by calling the control's Invalidate method. Calling Invalidate will force an entire client area repaint. It is also possible to force a smaller area to be repainted by passing a rectangle to the Invalidate method.

A control conists of zero or more non-client areas and a client areas. Non-client areas include items such as borders, scroll bars and so on. Certain controls perform custom non-client painting. One such example is the list view control that draws column header cells within the non-client area. For our simple control we will only be painting within the client area.

Figure 1 - Client and non-client areas

For the simple list control, we will simply paint all available rows whenever a paint request is received. Whilst this is a somewhat naive approach, it serves as a decent starting point.

Top

Generating Row Data

Switch to the solution tab and select the TestView.cs item. Right-click, then select View Code (or press F7) to view the auto-generated code. You should see something like the following (I removed unused usings for brevity).

using System.Windows.Forms;
using System.Drawing;

namespace Gui
{
  public partial class TestView : UserControl
  {
    public TestView()
    {
      InitializeComponent();
    }
  }
}

Before we can paint any rows, we need some data. To keep things simple, we can add a class method to add sample rows. I will call this new method, AppendSampleRows. We can then override the OnLoad method to call this method and add rows. We also need to maintain a reference to the rows within the control. A list of strings will suffice for now. Let's call this class member variable, _rows. The following code illustrates the idea.

using System;
using System.Collections.Generic;
using System.Drawing;
using System.Windows.Forms;

namespace Gui
{
  public partial class TestView : UserControl
  {
    private List<string> _rows = new List<string>();
    
    public TestView()
    {
      InitializeComponent();
    }

    public static void AppendSampleRows(int count)
    {
      for (int i=0; i<count; i++)
        AppendRow($"Row {i}");
    }

    protected override void OnLoad(EventArgs e)
    {
      _rowData = GenerateRowData(30);
    }    
  }
}

Code walkthrough...

1. Introduce a class member variable, _rows, this will maintain a list of rows to be painted.

2. Introduce a class method, AppendSampleRows, to add sample row data.

3. Override the OnLoad method and call the AppendSampleRows method.

Top

Painting Rows

Now, we can finally override OnPaint to paint the rows. Modify the code so that it looks like the following...

using System;
using System.Collections.Generic;
using System.Drawing;
using System.Runtime.CompilerServices;
using System.Windows.Forms;

namespace Gui
{
  public partial class TestView : UserControl
  {
    private IEnumerable<string> _rowData = new string[0];
    
    public TestView()
    {
      InitializeComponent();
    }

    public static void AppendSampleRows(int count)
    {
      for (int i=0; i<count; i++)
        AppendRow($"Row {i}");
    }

    protected override void OnLoad(EventArgs e)
    {
      _rowData = GenerateRowData(30);
    }

    protected override void OnPaint(PaintEventArgs e)
    {
      Graphics g = e.Graphics;
      Rectangle rcRow = ClientRectangle;
      int rowHeight = Font.Height;
      rcRow.Height = rowHeight;

      foreach (string rowText in _rowData)
      {
        g.DrawString(rowText, Font, Brushes.Black, rcRow);
        rcRow.Y += rowHeight;
      }
    }
  }
}

Build the project and run it (F5 for debug run, or CTRL + F5). You should see the following...

Figure 2 - First Run

Try resizing the window. You will notice there are no scroll bars. To view all rows, you essentially have to maximise the window. Still, it is about small incremental steps, learning as you go along. You can also modify the count in the GenerateRowData method. Don't expect any surprises, still, it can be useful to experiment.

Top

Code Walkthrough

So, at this point we have a simple control that can display rows of data. Let's do a code walk through.

1. We added a _rows variable that maintains a list of rows to be painted.

2. We added an AppendSampleRows method, which expects a count parameter. This method simply generates strings that our control can display. We generate text that results in row{N}, where N is the row number, this will prove useful for debugging purposes.

3. The OnPaint method was overridden to draw the individual rows. The implementation can be broken down as follows...

  • Create a temp variable 'g', to hold a reference to the graphics context, saves subsequent typing.
  • Drawing occurs within the client area, rcRow will track each row bounding rectangle as we proceed to draw rows.
  • We use the control's font height to specify the row height. Simplistic, but will suffice for a starting point.
  • As each row is of a fixed height, we set the initial height and can simplay walk through each row, adding the row height after each row.
Top

Friday, 23 September 2022

Displaying Raw Data In A Grid - Winforms

So, I wanted a way to quickly display data in Winforms (C#). Granted, we have ListView, but I hate the ceremony involved to populate a ListView. So, I decided to develop something similar to a ListView, but with a more econimcal API. I think I achieved that. Not quite as hard as you may think. I called my new control View, whch exists within the UI.UIGrid namespace.

In this post...

Top

1. Grid View Goals

  • Simple API
  • Fast
  • Extendible

My first take meets the first two criteria.

Top

2. Test Data

As with all things software, testing is key. For this particular solution a list of something is required. I opted for a simple list of customers. where the list count may be specified. The code for the test suite follows.

Top

2.1 Customer

using System;

namespace UI.App.DataAccess
{
  public class Customer
  {
    public string FirstName { get; }
    public string LastName { get; }
    public DateTime DOB { get; }

    public Customer(
      string firstName,
      string lastName,
      DateTime dob)
    {
      this.FirstName = firstName;
      this.LastName = lastName;
      this.DOB = dob;
    }
  }
}

Top

2.2. Customer Mock Data

using System;
using System.Collections.Generic;

namespace UI.App.DataAccess
{
  public static class MockData
  {
    public static IEnumerable<Customer> Random(int count)
    {
      DateTime start = new DateTime(1995, 1, 1);
      int range = (DateTime.Today - start).Days;

      for (int i=0; i<count; i++)
      {
        yield return new Customer(
          $"First{i}",
          $"Last{i}",
          start.AddDays(i));
      }
    }
  }
}
Top

3. Grid View As A User Control

Figure 1: Grid View

The above image illustrates the components of the grid view. The grid view consists of a User Control that contains the following...

  1. A header (UIColumns in this case)
    UIColumns is a Panel control that is used to display individual coumns. UIColumns overrides the Paint event.
  2. A rows view (a Panel derived view)
    No surprises here, the rows view is responsible for painting row data.
Top

3.1. Using the Grid View

To use my grid control, from say, a form, I used the following code...

protected override void OnLoad(EventArgs e)
{
  new UIGrid.View()
  {
    Parent = this,
    Dock = DockStyle.Fill,
  }
  .WithColumn("First Name", 80)
  .WithColumn("Last Name", 80)
  .WithColumn("DOB", 80)
  .WithData(
  DataAccess.MockData.Random(50000),
  (c, cells) =>
  {
    cells[0] = c.FirstName;
    cells[1] = c.LastName;
    cells[2] = c.DOB.ToString("dd/MM/yyyy");
  });
}
Top

3.2. Grid View Output

So, the expected output of my grid view is as follows...

Let's introduce some concepts...

  • The view will have columns.
  • The view will have rows where each row's width is specified by its column.
  • Each row will contain one or more cells, essentially strings for now.

4. Implementation

In this section I will show/discuss the implementation used to realise my original concept. Here goes...

Top

4.1. Column

using System;

namespace UI.UIGrid
{
  public class Column
  {
    public string Title { get; }
    public int Width { get; }
    
    public Column(
      string title,
      int width)
    {
      this.Title = title;
      this.Width = width;
    }

    public override string ToString() =>
      $"{Title}, {Width}";
  }
}

The column class is simple, it simply stores the column title and the column width.

Top

4.2. Rows

namespace UI.UIGrid
{
  public class Row
  {
    public View View { get; }
    public string[] Cells { get; }

    public Row(
      View view,
      string[] cells)
    {
      this.View = view;
      this.Cells = cells;
    }
  }
}

The row class is also simple. It maintains a back pointer to the View, and a collection of cells (strings). An array of strings is used to optimise lookup.

Top

4.3. Rows View

using System.Windows.Forms;

namespace UI.UIGrid
{
  public partial class RowsView : Panel
  {
    public RowsView()
    {
      InitializeComponent();
      DoubleBuffered = true;
      ResizeRedraw = true;
    }
  }
}
Top

4.4. View

The view class is reponsible for drawing columns and rows, and processing events. One could create separate, panel-derived classes, one for columns and one for rows. The problem with this approach is sharing data between the different controls. My approach simplifies data exchange (all in one class, the View) at the expense of slightly more verbose code. Software, always trade offs!

using System;
using System.Collections.Generic;
using System.Drawing;
using System.Linq;
using System.Windows.Forms;

namespace UI.UIGrid
{
  public partial class View : UserControl
  {
    /// <summary>
    /// Two controls, one for columns, one for rows.
    /// Allow easy access to scroll info, given a control.
    /// </summary>
    public struct ScrollInfo
    {
      public int X;
      public int Y;

      public ScrollInfo(int x, int y)
      {
        this.X = x;
        this.Y = y;
      }

      public static ScrollInfo FromControl(Panel c)
      {
        return new ScrollInfo(
          -c.AutoScrollPosition.X,
          -c.AutoScrollPosition.Y);
      }
    }

    private readonly List<Column>; _columns = new List<Column>();
    private readonly List<Row> _rows = new List<Row>();
    private readonly Color _gridColor = Color.Gainsboro;
    private int _rowHeight;

    public View()
    {
      InitializeComponent();
      UIColumnsInit();
      UIRowsInit();
      _rowHeight = Font.Height + 4;
    }

    public View WithColumn(string title, int width)
    {
      _columns.Add(new Column(title, width));
      return this;
    }

    public View WithData<T>(
      IEnumerable<T> data,
      Action<T, string[]> mapRowCells)
    {
      _rows = data
        .Select(r =>
        {
          string[] row = new string[_columns.Count];
          mapRowCells(r, row);
          return new Row(this, row);
        }).ToList();
      return this;
    }

    private void UIColumnsInit()
    {
      UIColumns.Height = Font.Height;
      UIColumns.Paint += UIColumns_Paint;
    }

    private void ForceColumnsRepaint()
    {
      UIColumns.Invalidate();
      UIColumns.Update();
    }

    private void UIColumns_Paint(object sender, PaintEventArgs e)
    {
      e.Graphics.TranslateTransform(
        UIRows.AutoScrollPosition.X,
        0);

      Rectangle rcCol = new Rectangle(
        UIColumns.ClientRectangle.Left,
        UIColumns.ClientRectangle.Top,
        0,
        UIColumns.ClientRectangle.Height);

      _columns.ForEach(col =>
      {
        rcCol.Width = col.Width;
        e.Graphics.DrawString(col.Title, Font, Brushes.White, rcCol);
        e.Graphics.DrawLine(Pens.Gainsboro, rcCol.Right - 1, rcCol.Top, rcCol.Right - 1, rcCol.Bottom);
        rcCol.X = rcCol.Right;
      });
    }

    private void UIRowsInit()
    {
      UIRows.Paint += UIRows_PaintNaive;
      UIRows.Scroll += UIRows_Scroll;
      UIRows.Resize += (e, s) => ForceColumnsRepaint();
    }

    private void UIRows_Scroll(object sender, ScrollEventArgs e)
    {
      // Force columns to repaint upon a horizontal scroll event.
      if (e.ScrollOrientation == ScrollOrientation.HorizontalScroll)
        ForceColumnsRepaint();
    }

    /// <summary>
    /// Paint vertical grid lines in UIRows control.
    /// </summary>
    /// <param name="g"></param>
    /// <returns>Total columns width.</returns>
    private int PaintVerticalGridLines(
      Graphics g,
      Color lineColor,
      int yScroll)
    {
      int right = 0;
      using (Pen pen = new Pen(lineColor, 1))
      {
        _columns.ForEach(c =>
        {
          right += c.Width;
          g.DrawLine(
            pen,
            right - 1,
            UIRows.DisplayRectangle.Top,
            right - 1,
            UIRows.DisplayRectangle.Bottom + yScroll);
        });
      }
      >return right;
    }

    private void PaintRow(
      Graphics g,
      Pen gridPen,
      Font font,
      Rectangle rcRow,
      int xScroll,
      Row row)
    {
      Rectangle rcCell = rcRow;
      rcCell.X = 0;
      for (int cell = 0; cell < _columns.Count; cell++)
      {
        rcCell.Width = _columns[cell].Width;
        g.DrawString(row.Cells[cell], font, Brushes.Black, rcCell);
        rcCell.X = rcCell.Right;
      }
      g.DrawLine(gridPen, rcRow.Left, rcCell.Bottom, rcRow.Right + xScroll, rcCell.Bottom);
    }

    private void UIRows_PaintNaive(object sender, PaintEventArgs e)
    {
      e.Graphics.TranslateTransform(
        UIRows.AutoScrollPosition.X,
        UIRows.AutoScrollPosition.Y);

      ScrollInfo si = ScrollInfo.FromControl(UIRows);
      Rectangle rcDisp = UIRows.ClientRectangle;
      Rectangle rcRow = new Rectangle(0, 0, DisplayRectangle.Width + si.X, _rowHeight);
      rcDisp.Offset(-UIRows.AutoScrollPosition.X, -UIRows.AutoScrollPosition.Y);

      int yPos = 0;
      using (Pen penGrid = new Pen(_gridColor, 1))
      {
        for (int row = 0; row < _rows.Count; row++)
        {
          rcRow.Y = yPos;
          PaintRow(e.Graphics, penGrid, Font, rcRow, si.X, _rows[row]);
          yPos += _rowHeight;
        }
      }

      int right = PaintVerticalGridLines(e.Graphics, Color.Gainsboro, si.X);
      UIRows.AutoScrollMinSize = new Size(right, _rows.Count * _rowHeight);
    }

    private void UIRows_Paint(object sender, PaintEventArgs e)
    {      
      e.Graphics.TranslateTransform(
        UIRows.AutoScrollPosition.X,
        UIRows.AutoScrollPosition.Y);

      ScrollInfo si = ScrollInfo.FromControl(UIRows);      
      Rectangle rcDisp = UIRows.ClientRectangle;
      Rectangle rcRow = new Rectangle(0,0,DisplayRectangle.Width + si.X,_rowHeight);
      rcDisp.Offset(-UIRows.AutoScrollPosition.X, -UIRows.AutoScrollPosition.Y);      

      int yPos = 0;
      using (Pen penGrid = new Pen(_gridColor, 1))
      {
        for (int row = 0; row < _rows.Count; row++)
        {
          rcRow.Y = yPos;
          if (rcRow.IntersectsWith(rcDisp))
            PaintRow(e.Graphics, penGrid, Font, rcRow, si.X, _rows[row]);
          yPos += _rowHeight;
        }
      }

      int right = PaintVerticalGridLines(e.Graphics, Color.Gainsboro, si.X);
      UIRows.AutoScrollMinSize = new Size(right, _rows.Count * _rowHeight);
    }
  }
}
Top

Code Analysis

Most of the code should be easy enough to follow. However, some may have noticed that I have two row paint methods, namely, UIRows_PaintNaive and UIRows_Paint. One is optimal and the other is sub-optimal and, for large row counts will appear to update slowly. Of course, one could argue that displaying more than, say, a 1000 rows is not ideal. It is probably better to offer a search or paging mechanism. Still, sometimes, for debugging purposes, algorithmic purposes, displaying a large row count might be useful.

In both cases, the document size is calculated. The UIRows control's AutoScrollMinSize is updated to reflect the document size. Note, while the AutoScrollMinSize is updated, I refrain from setting AutoScroll to true. I noticed, during development and testing that AutoScroll set to true can cause problems. The header is repainted if the user performs a horizontal scroll.

One can view the overall painting process as a view within a larger view. This is typically known as a viewport. A viewport is simply the visible area within a document that is too big to display in its entirety. One can actually envisage a viewport as an actual window. If you look straight ahead out of a window you will get one perspective. If you now move your head, and say, bend at you your knees, you will see an entirely different perspective. The point is, you cannot see all there is too see out of your window. To see more you must reorient yourself, or invest in a larger window.

The above diagram illustrates considerations required when painting a document that is much larger than the available display size.

The following analyses the two different row paint approaches.

Naive Paint Method

The naive paint method iterates and draws all rows. The Operating System will clip accordingly. However, calculations are still performed for each row. Also, clipping will increase the time required to process each row.

As one might expect, this is the least performant approach, as we attemptto calculate, and paint all rows, regardless of whether or not they fall within the viewport area.
Saturday, 26 March 2022

Pixel Graphics Winforms

In an older post I illustrated how one can achieve decent pixel-based graphics. Following further research, I built upon the original idea. In this post, I achieve render times of about 11 milliseconds. For 60 FPS one must render each frame in about 16.7 milliseconds.

Top

Background

In the early days of Windows, an application could fully control the graphics display. Early games took advantage of this and essentially bypassed the operating system. Modern Windows due to its multitasking nature, no longer allows an application to "own" any resources outright. Resources are shared, including graphical data. Personally, I think the operating system should have a "Game Mode" setting, where only critical processes, threads, etc are run. I mean, does anyone want to run multiple apps whilst running a game?

Modern games use the graphics card(GPU) to output graphics. Data is sent to the GPU, leaving the CPU to perform CPU-bounds tasks (updating player position, score and so on). This is great if your app has access to DirectX, Direct 3D, OpenGL. However, if your app is unable to access such technology, and you are bound by simple Winforms technology...Read on!

Top

Winforms Graphics Basics

Each Window is assigned a graphics context. This usually arises in a Window's OnPaint event. Paint messages are classed as low priority messages, and as such are posted rather than sent. A sent message yields an immediate return, posted messages will yield a result in the future. The above is based upon ealier versions of Windows, though I doubt much has changed. Regardless, the OnPaint and supplied Graphics context is what is of interest here.

Top

Memory

C# as a rule manages memory. One can allocate memory (not directly) by creating new classes, structures etc. The memory required for such items will be released when the class/struct instance is no longer required. The CLR runtime can also relocate memory as and when required. When dealing with bitmaps, the latter is not ideal. Relocating memory for large bitmaps is expensive in terms of CPU time.

It is possible to allocate memory outside of the CLR. Doing so ensures that the CLR will never try to reclaim the memory. Put another way, you will be responsible for memory management. Almost in C++ land!

Manual memory management is a must for fast pixel graphics.

Top

Image Processing Pipeline

The basic pipeline is as follows...

  • Create an array to hold image information
  • Create a bitmap that uses memory from 1st step
  • Update array to reflect image information (Bitmap points to array memory so is automatically updated)
  • Blit bitmap to main form or relevant window
  • Repeat until app ends
Top

Multithreading/async programming

>My own research proved that adding threads or using asynchronous programming did not yield better results.

A Windows message loop generally doesn't play well with other threads. Typically, additional threads, at some point must communicate results with the main UI thread. This requires thread synchronisation techniques, which tend to be quite expensive. Performing most operations on the same thread seems to give best results.

That said, updating non UI elements may be worthwhile performing on separate thread(s). For example, whilst the UI thread is blitting current content, another thread might update values for the next scene.

Top

Achieving Optimal Paint Results

As mentioned, Windows posts a WM_PAINT message to a window, when an application window needs re-painting. One can invoke the WM_PAINT, and hence cause window repainting by issuing an Invalidate command. This may be followed by an Update command to perform immediate repainting.

I found that the best way to do this is to override the Application.OnIdle event. In the handler, one can just call invalidate. This will post the WM_PAINT message to the window. Once painting has occurred, the idle event will be raised again. This essentially causes a forever painting loop whilst still being responsive to other events.

The Code

The project is a .NET Windows Application targeting .NET Framework 4.8. No 3rd party libraries are used.


  using System;
  using System.Drawing;
  using System.Drawing.Imaging;
  using System.Runtime.InteropServices;
  
  namespace FastGraphics
  {
    /// <summary>
    /// Uses pinned memory and direct array access to manipulate bitmap bits.
    /// Pinned memory is not owned by the CLR, so, it is important to free when done.
    /// </summary>
    public sealed class FastBitmap : IDisposable
    {
      private GCHandle _pinnedMemoryHandle;
      private IntPtr _pinnedMemoryAddress;    
  
      public int Width { get; private set; }
      public int Height { get; private set; }
      public uint[] Pixels { get; private set; }
      public Bitmap Image { get; private set; }
  
      public FastBitmap(int width, int height)
      {
        // Pixels is an array that may be used to modify pixel data.
        // Typical formula is ((y*width)+x) = Alpha | Colour;
        // Uses 4 bytes per pixel (Alpha, Red, Green and Blue channels, each 8 bits)
        Pixels = new uint[width * height];
  
        // Inform OS that pixel allocated array is pinned and not subject to normal garbage collection.
        _pinnedMemoryHandle = GCHandle.Alloc(Pixels, GCHandleType.Pinned);
  
        // Obtain the pinned memory address, required to create bitmap for use by .NET app.
        _pinnedMemoryAddress = _pinnedMemoryHandle.AddrOfPinnedObject();
  
        // Set pixel format and calculate scan line stride.
        PixelFormat format = PixelFormat.Format32bppArgb;
        int bitsPerPixel = ((int)format & 65280) >> 8;
        int bytesPerPixel = (bitsPerPixel + 7) / 8;
        int stride = 4 * ((width * bytesPerPixel + 3) / 4);
        Image = new Bitmap(width, height, stride, PixelFormat.Format32bppArgb, _pinnedMemoryAddress);
        Width = width;
        Height = height;      
      }
  
      public void Draw(Graphics target) =>
        target.DrawImage(Image, 0, 0);
  
      public void Dispose()
      {
        Image.Dispose();
  
        if (_pinnedMemoryHandle.IsAllocated)
          _pinnedMemoryHandle.Free();
  
        _pinnedMemoryAddress = IntPtr.Zero;
        Pixels = Array.Empty<uint>();
        Width = 0;
        Height = 0;
      }
    }
  }
  

    using System;
    using System.Windows.Forms;
    
    namespace FastGraphics
    {
      internal static class Program
      {
        [STAThread]
        static void Main()
        {
          Application.EnableVisualStyles();
          Application.SetCompatibleTextRenderingDefault(false);
    
          try
          {
            Form1 form = new Form1();
            Application.Idle += (s, e) => form.OnIdle();
            Application.Run(form);
          }
          catch (Exception ex)
          {
            MessageBox.Show(ex.Message);
          }
        }
      }
    }

      using System;
      using System.Drawing.Drawing2D;
      using System.Windows.Forms;
      
      namespace FastGraphics
      {
        public partial class Form1 : Form
        {
          private FastBitmap _fastBitmap;
          private float _offset = 0;
      
          private uint _renderTimeInMilliseconds;
      
          public Form1()
          {
            InitializeComponent();
          }
      
          /// <summary>
          /// Update on-screen text that displays render time in miliiseconds.
          /// </summary>
          public void UpdateRenderTimeText()
          {
            label1.Text = _renderTimeInMilliseconds.ToString();
          }
      
          /// <summary>
          /// Dispose of existing fast bitmap (if exists)
          /// Create new fast bitmap based upon client rectangle.
          /// </summary>
          private void CreateFastBitmap()
          {
            _fastBitmap?.Dispose();
            _fastBitmap = new FastBitmap(ClientRectangle.Width, ClientRectangle.Height);
          }
      
          public void OnIdle()
          {
            Invalidate();
            UpdateRenderTimeText();
          }
      
          // Resizing form changes drawing area.
          // Resize fast bitmap accordingly.
          protected override void OnResize(EventArgs e)
          {
            CreateFastBitmap();
          }
      
          /// <summary>
          /// Override OnPaintBackground to do nothing.
          /// The OnPaint will perform all drawing.
          /// </summary>
          /// <param name="e"></param>
          protected override void OnPaintBackground(PaintEventArgs e)
          {
          }
      
          /// <summary>
          /// Magic happens in OnPaint.
          /// 1. Render raw pixel data (Fast bitmap)
          /// 2. Due to the nature of fast bitmap, its image will reflect pixel data.
          /// 3. Draw fast bitmap image to this form's window.
          /// 4. Time all of this so we can determine time taken to render a frame.
          /// Optional - set interpolation mode.
          /// </summary>
          /// <param name="e"></param>
          protected override void OnPaint(PaintEventArgs e)
          {
            DateTime startTime = DateTime.UtcNow;
            e.Graphics.InterpolationMode = InterpolationMode.NearestNeighbor;
            RenderRawPixels();
            _fastBitmap.Draw(e.Graphics);
            this.BackgroundImage = _fastBitmap.Image;
            DateTime endTime = DateTime.UtcNow;
            _renderTimeInMilliseconds = (uint)(endTime - startTime).Milliseconds;
          }
      
          /// <summary>
          /// RenderRawPixels is called for each onPaint.    
          /// </summary>
          private void RenderRawPixels()
          {
            int rowAddress = 0;
            int width = _fastBitmap.Width;
            int height = _fastBitmap.Height;
            uint[] pixels = _fastBitmap.Pixels;
      
            for (int y = 0; y < height; y++)
            {
              float yF = (float)y;
              for (int x = 0; x < width; x++)
              {
                float xF = (float)x;
      
                float f =
                  ((xF * xF * xF * yF) / 16384) +
                  ((xF * yF * yF * yF) / 16384) +
                  ((xF * yF * _offset) / 16384);
                f *= _offset;
                f /= 65536;
                f /= 8192;
      
                uint alpha = 4278190080;
                // Alpha component tends to double rendering time
                // Setting to 0xFF000000 will ensure the above renders solid colours.
                // Uncomment the code below to introduce alpha component.
                //uint alpha = (uint)(
                //  (x * y) -
                //  (y * _offset)) /
                //  1024;
                //alpha <<= 24;
                //alpha &= 0xff000000;
      
      
                pixels[rowAddress + x] = alpha | (uint)(f * 16777215);
              }
              rowAddress += width;
            }
            BackgroundImage = _fastBitmap.Image;
            _offset += 0.005;
          }
      
          /// <summary>
          /// upon closing this form, we must dispose the fast bitmap.
          /// </summary>
          /// <param name="e"></param>
          protected override void OnClosed(EventArgs e)
          {
            _fastBitmap.Dispose();
            base.OnClosed(e);
          }
        }
      }

        namespace FastGraphics
        {
          partial class Form1
          {
            /// <summary>
            /// Required designer variable.
            /// </summary>
            private System.ComponentModel.IContainer components = null;
        
            /// <summary>
            /// Clean up any resources being used.
            /// </summary>
            /// <param name="disposing">true if managed resources should be disposed; otherwise, false.</param>
            protected override void Dispose(bool disposing)
            {
              if (disposing && (components != null))
              {
                components.Dispose();
              }
              base.Dispose(disposing);
            }
        
            #region Windows Form Designer generated code
            /// <summary>
            /// Required method for Designer support - do not modify
            /// the contents of this method with the code editor.
            /// </summary>
            private void InitializeComponent()
            {
              this.label1 = new System.Windows.Forms.Label();
              this.SuspendLayout();
              // 
              // label1
              // 
              this.label1.BackColor = System.Drawing.Color.Black;
              this.label1.ForeColor = System.Drawing.Color.White;
              this.label1.Location = new System.Drawing.Point(-2, -1);
              this.label1.Name = "label1";
              this.label1.Size = new System.Drawing.Size(43, 18);
              this.label1.TabIndex = 0;
              this.label1.Text = "Time";
              this.label1.TextAlign = System.Drawing.ContentAlignment.MiddleCenter;
              // 
              // Form1
              // 
              this.AutoScaleDimensions = new System.Drawing.SizeF(6, 13);
              this.AutoScaleMode = System.Windows.Forms.AutoScaleMode.Font;
              this.ClientSize = new System.Drawing.Size(800, 450);
              this.Controls.Add(this.label1);
              this.DoubleBuffered = true;
              this.Name = "Form1";
              this.Text = "Form1";
              this.WindowState = System.Windows.Forms.FormWindowState.Maximized;
              this.ResumeLayout(false);
        
            }
        
            #endregion
            public System.Windows.Forms.Label label1;
          }